Hexi Pullover w/Squares
To purchase a downloadable copy click below
Hexi Pullover w/Squares
brought to you by MTP Designs
a subsidiary of Madd Tea Party Boutique
Copyright 2026

Materials:
#4 medium weight yarn, approx 1200-1300 yards
J/6mm hook
G/4mm hook (for attaching back panels only)
Needle for sewing in ends and attaching pieces
Stitch Guide:
sl: slip stitch
ch: chain
sk: skip
st: stitch
bb: back bump
yo: yarn over
mc: main colour
ac: accent colour
blo: back loop only
flo: front loop only
dc: double crochet
dc incr: double crochet increase
cluster: 3 dc together in one sp or ch
fpdc: front post double crochet
bpdc: back post double crochet
Special Instructions: Each side panel made as instructed:
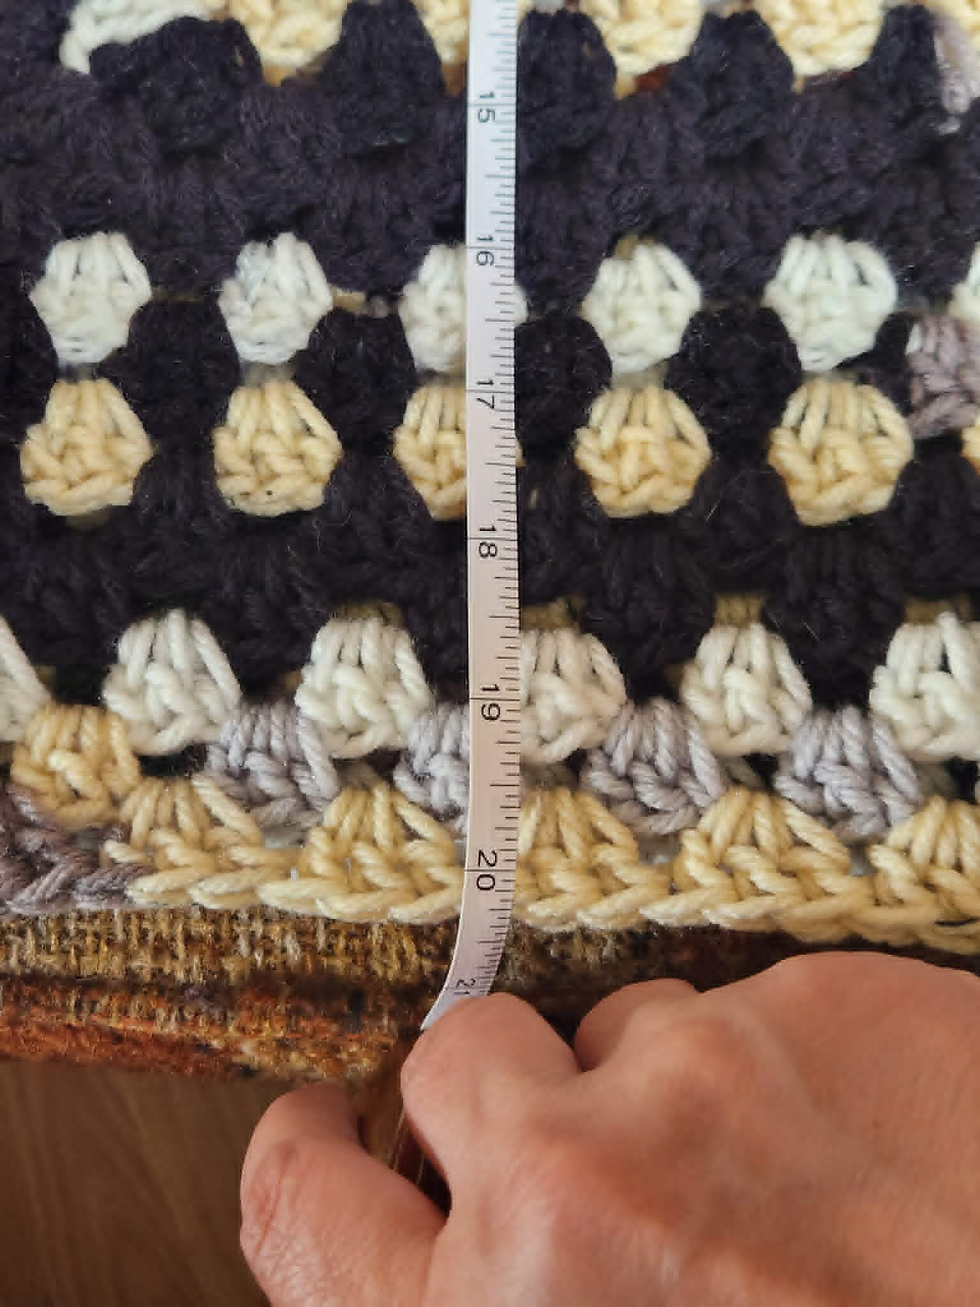
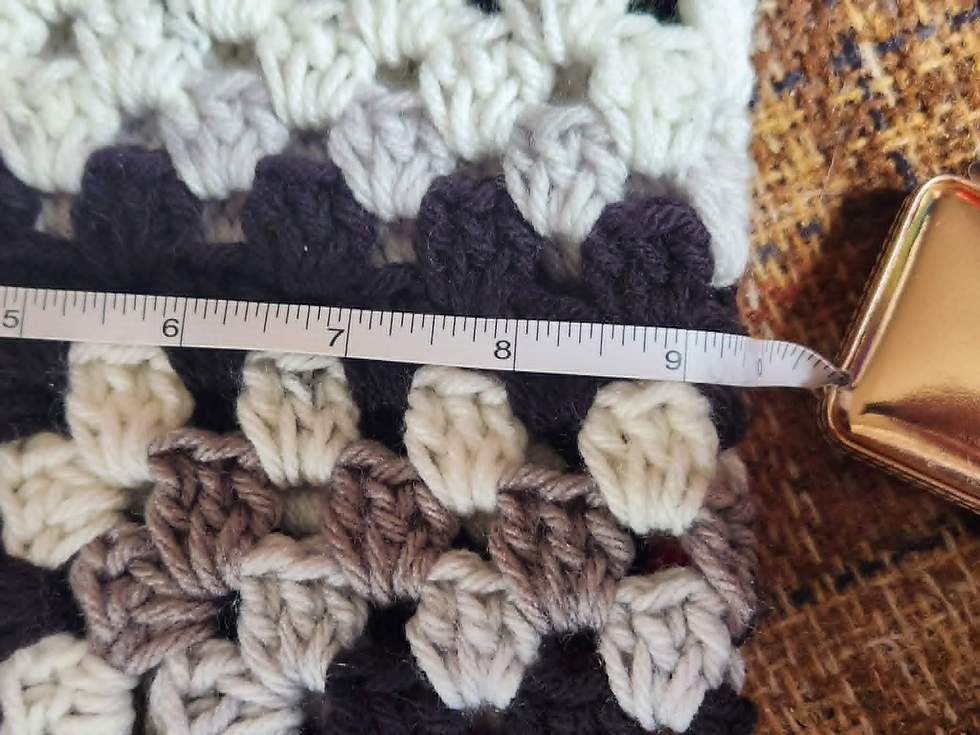
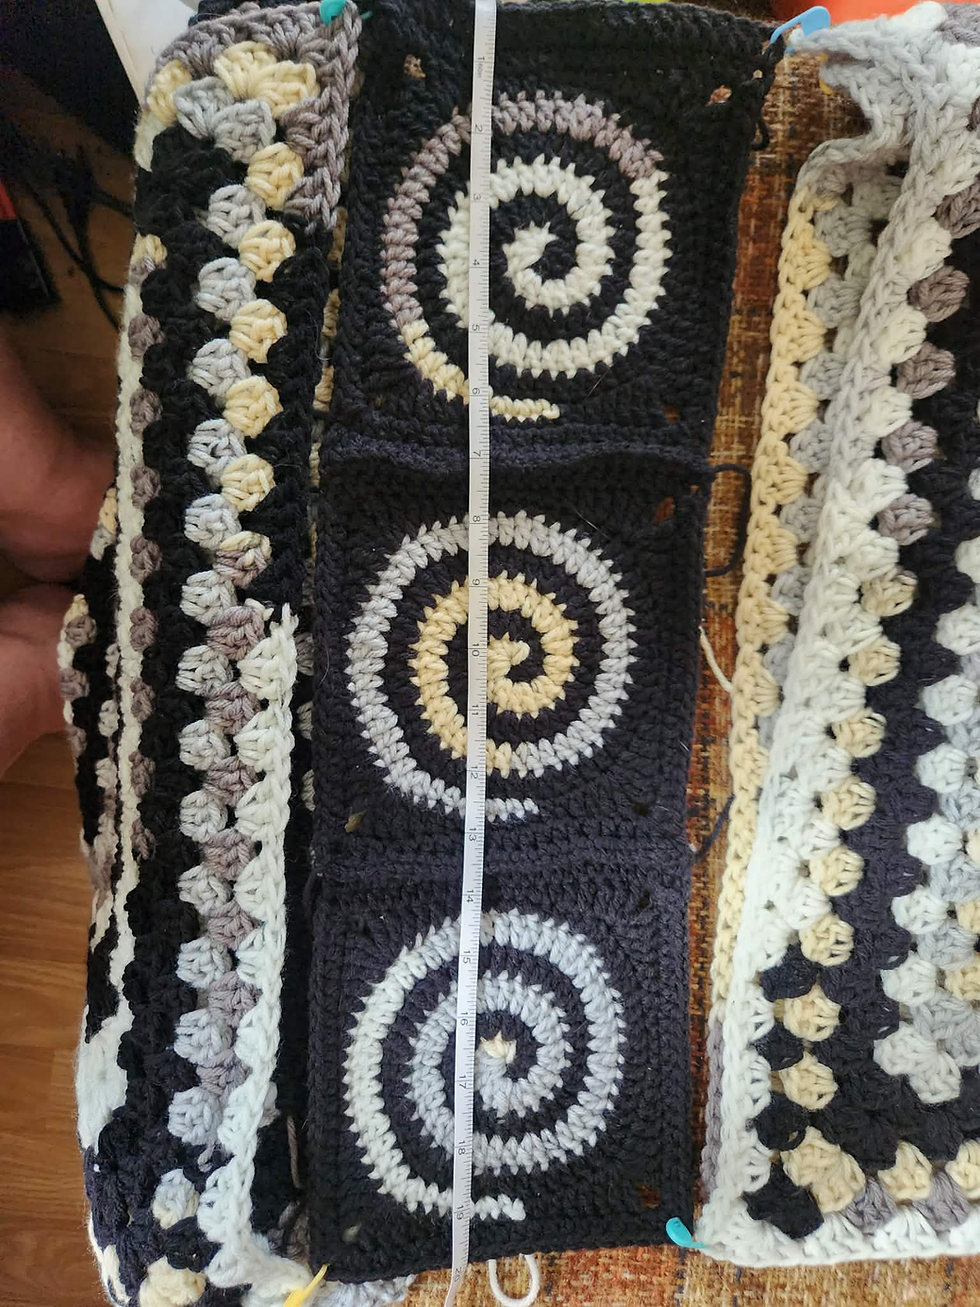
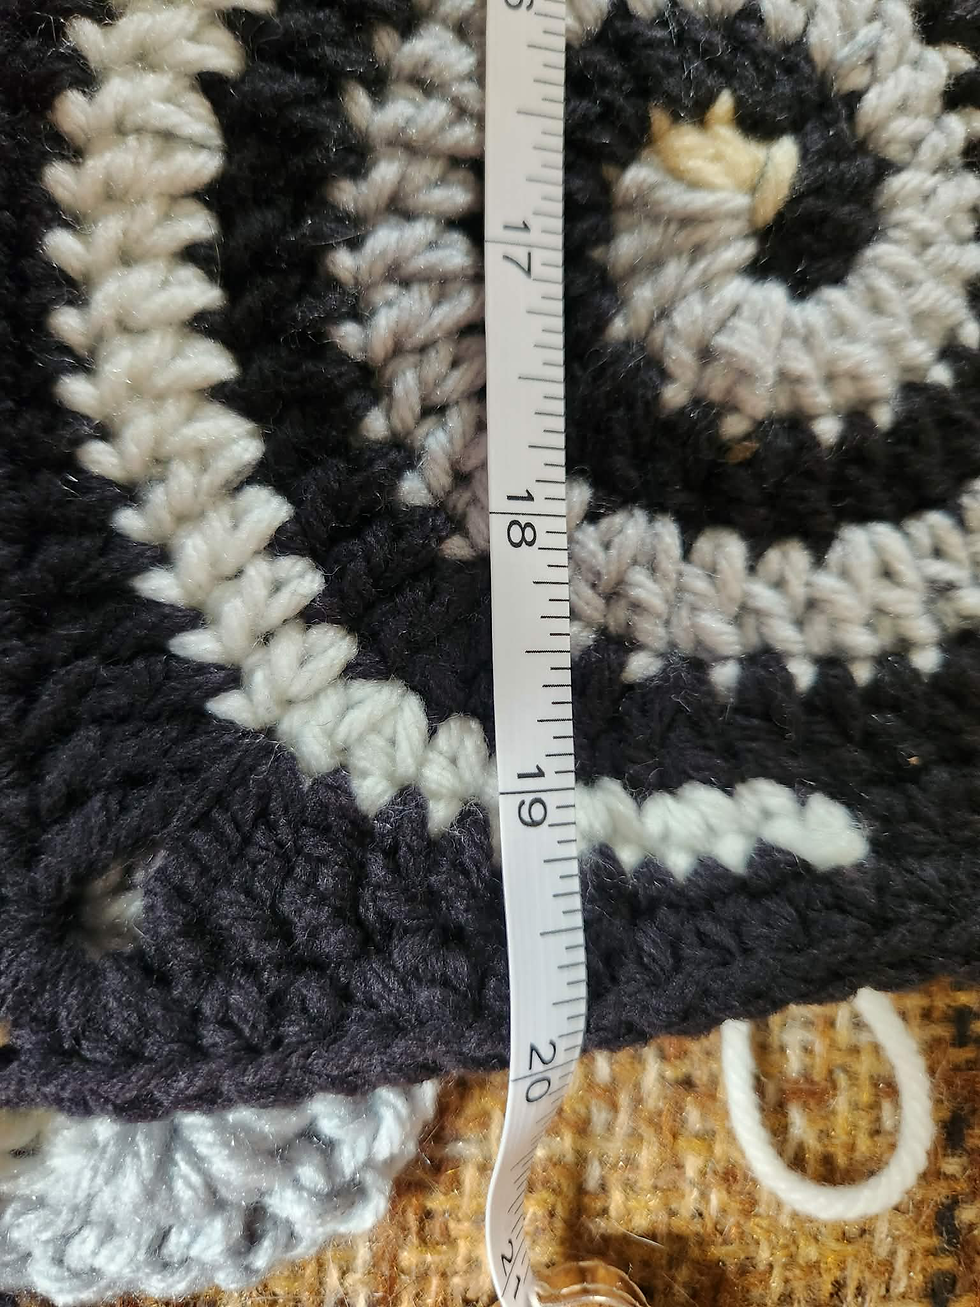
Length top to bottom= 20”
Sleeve= 10”
Back panel= 20”


Making it bigger:
Increase the amount of rounds you want on the side panels, when you fold the side panel into the L shape, remember that one of those is the sleeve, so it +2 rounds (for the join) will be the circumference of the sleeve
Keeping in mind that each square and the row on top = 6 dc cluster
The back panel is the exact size to fit with the two panels as designed to 18 rounds, so if you increase the amount of rounds on the side panels, you will also need to make the back panel longer, each round extra will require 1 extra row of dc between the panels, which can be accomplished with a simple turn and repeat the row before
Making it smaller:
You can only make this sweater up to 3 rounds smaller because of the back panel, the following are the adjustments to the back panel based off the amount of rounds left off:
3: attach squares to each other with a sc through the corners and flo of both squares x22 (24) – do not do last row
2: do not do last row on square attachment instructions
1: attach squares directly to each other with a sl, do the last dc row as instructed, then turn the piece upside down so you can work on the bottom, and repeat the last row
Weaving in ends: you can choose to weave in ends as you go, or weave them all in at the end like I do These instructions are written with no colour changes for stripes, if you want
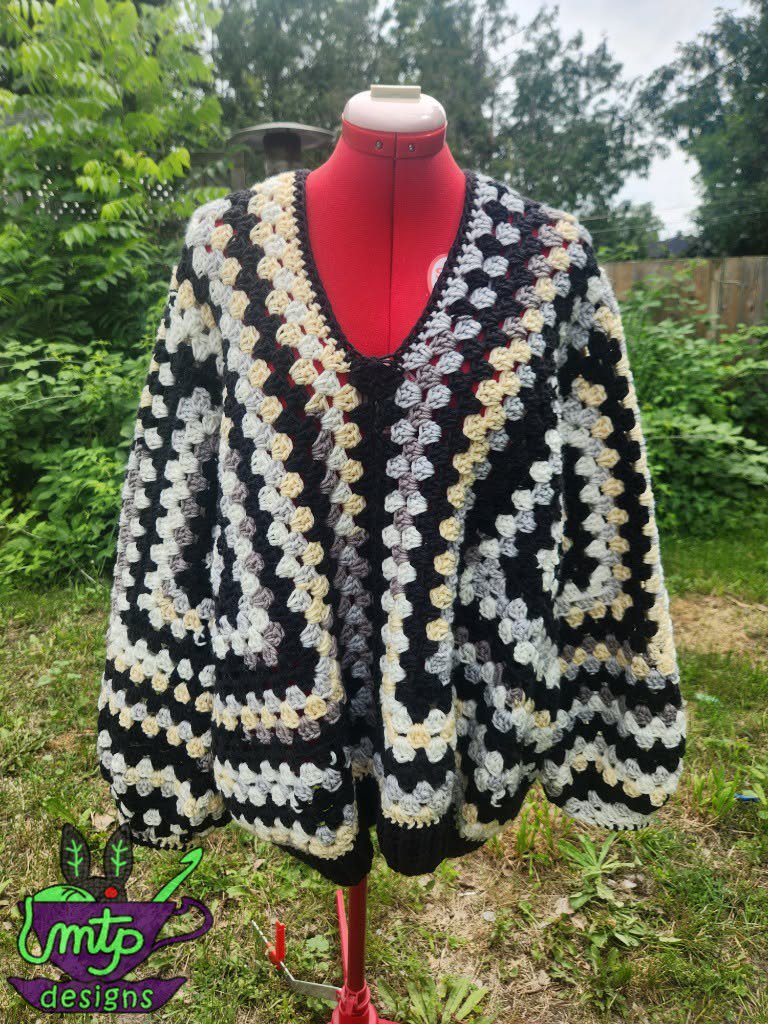
stripes like pictured at the beginning of this pattern, follow this sequence:
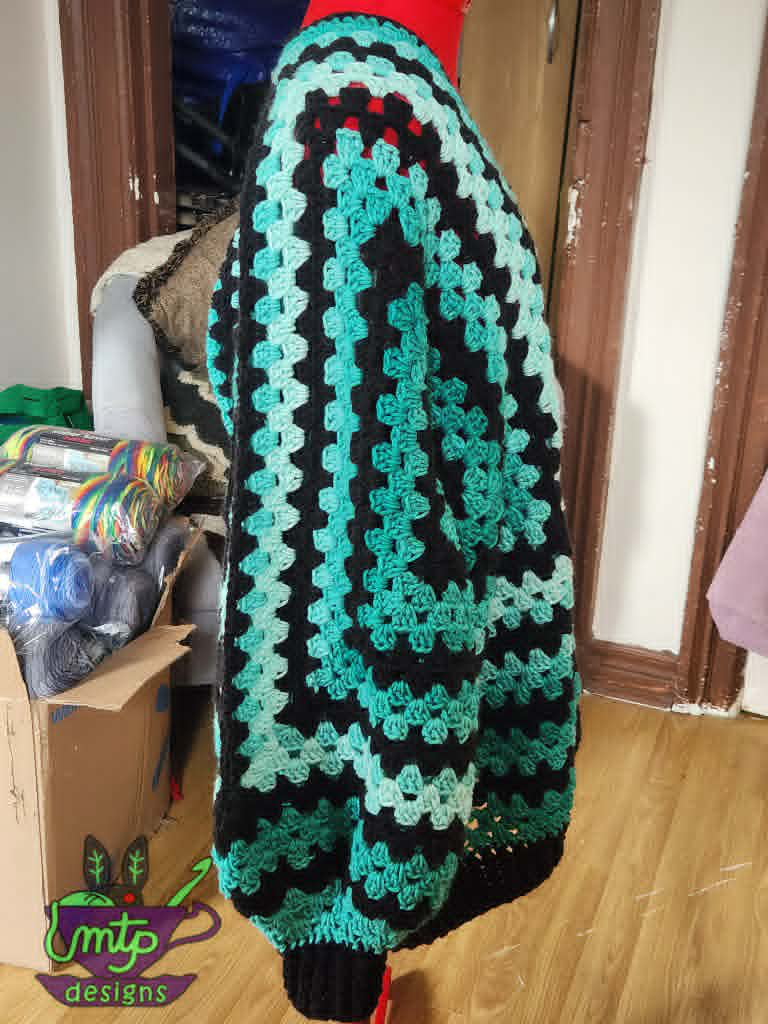
mc= black
ac= spearmint
start with 3 rounds of ac, then work alternating rounds of 2 mc/3 ac: the side panels will end with 3 ac rounds, the joins of the front and sleeves = 2 rounds/rows completing the pattern
Tips and Tricks for Striping: If you want to make a pattern of stripes, always keep in mind that the joins of the front and the sleeve = 2rounds/rows
Attaching the Back Panel: There are full instructions for crocheting the back panel on, but if you feel more comfortable you can attach with a simple whip st
Meet the Maker: Hi! I'm Lizzie Livett-Buchanan, the strange and unusual mind behind the strange and unusual designs from MTP Designs. I love to create the weird, the unusual, and sometimes even the macabre! I hope you enjoy making this as much as I enjoyed
writing it! I love to see what people come up with working with my patterns, so please join us in my group on facebook!!
Side Panels: (make two) (6mm hook)
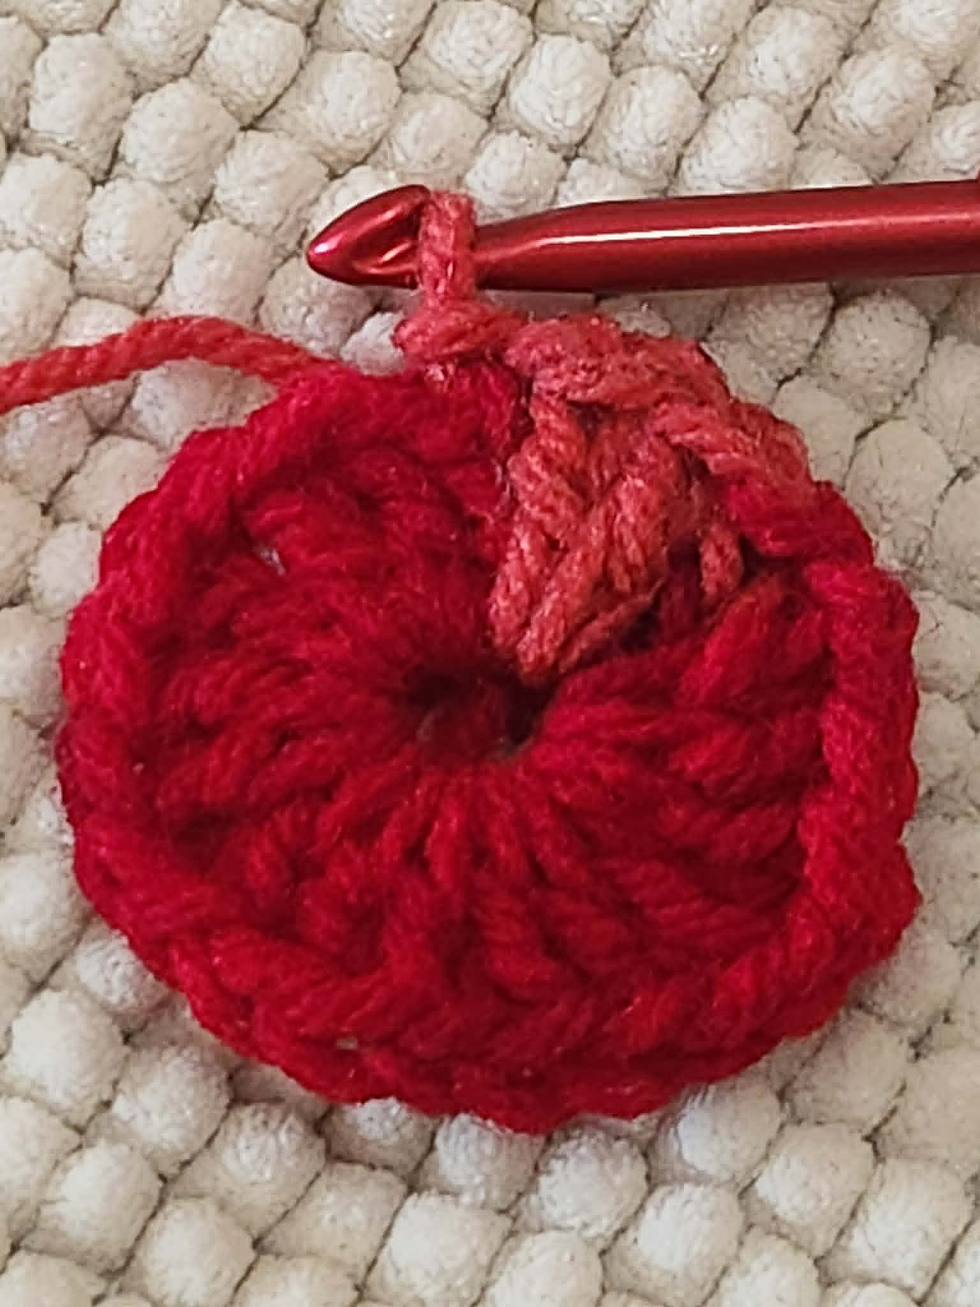
Start with a magic circle, or ch 4 with a sl to join, however you feel comfortable starting on the round
Round 1: ch 3 (counts as first dc now and throughout), 2 dc, ch 1, (3 dc, ch 1) x5,
sl to top of ch 3 to join, sl to the next ch sp (6 clusters)
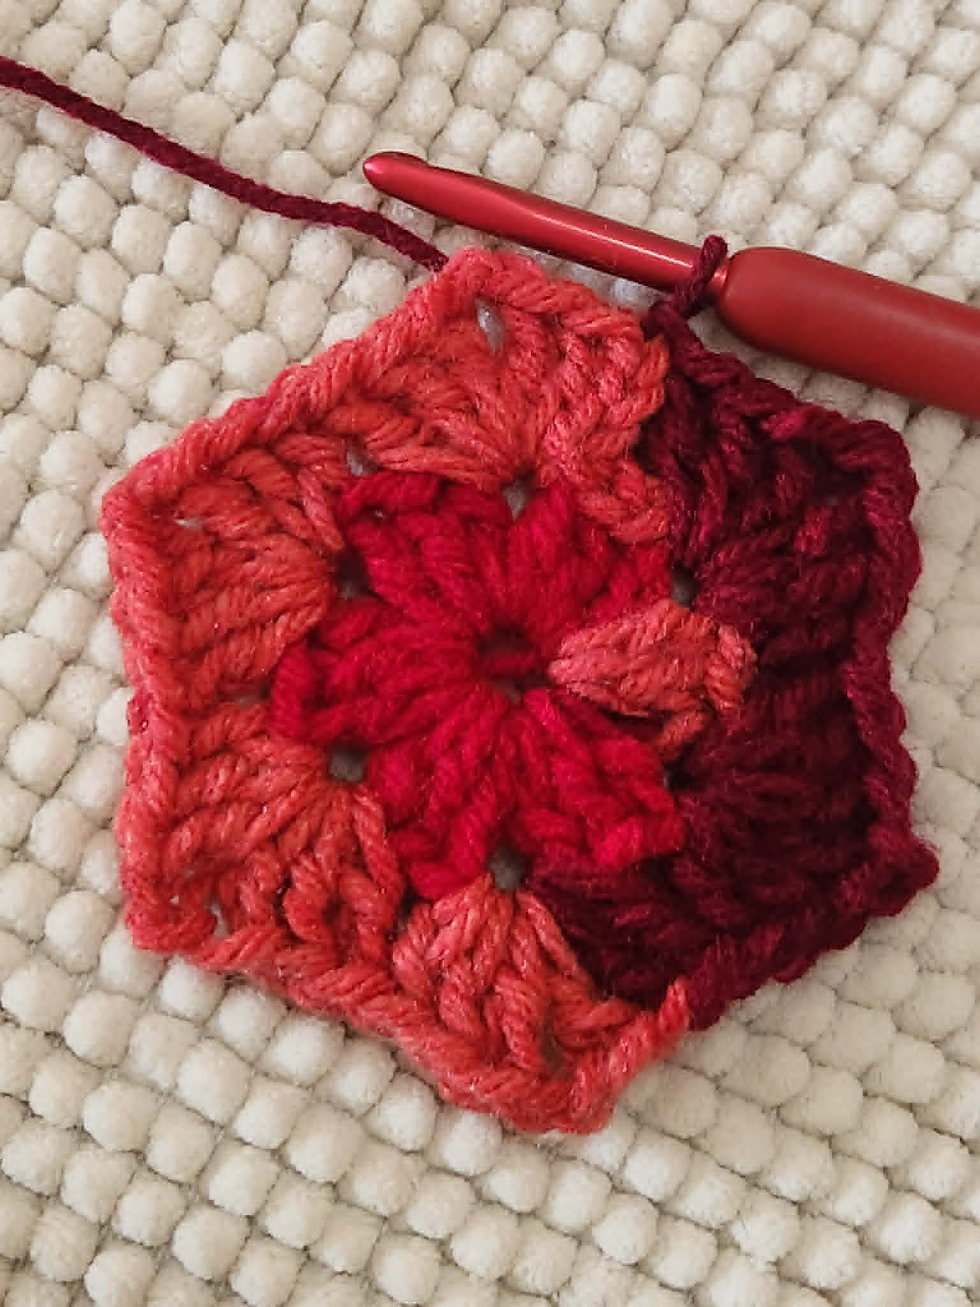
Round 2: ch 3, 2 dc + ch 2 + 3 dc, (3 dc + ch 2 + 3 dc in the next ch sp) x5, sl to top of ch 3 to join, sl to the next ch sp (12 clusters)
Round 3: ch 3, 2 dc + ch 2 + 3 dc, (3 dc in the next sp, 3 dc + ch 2 + 3 dc in the next corner ch sp), x5, sl to the top of ch 3 to join, sl to the next sp (18 clusters)
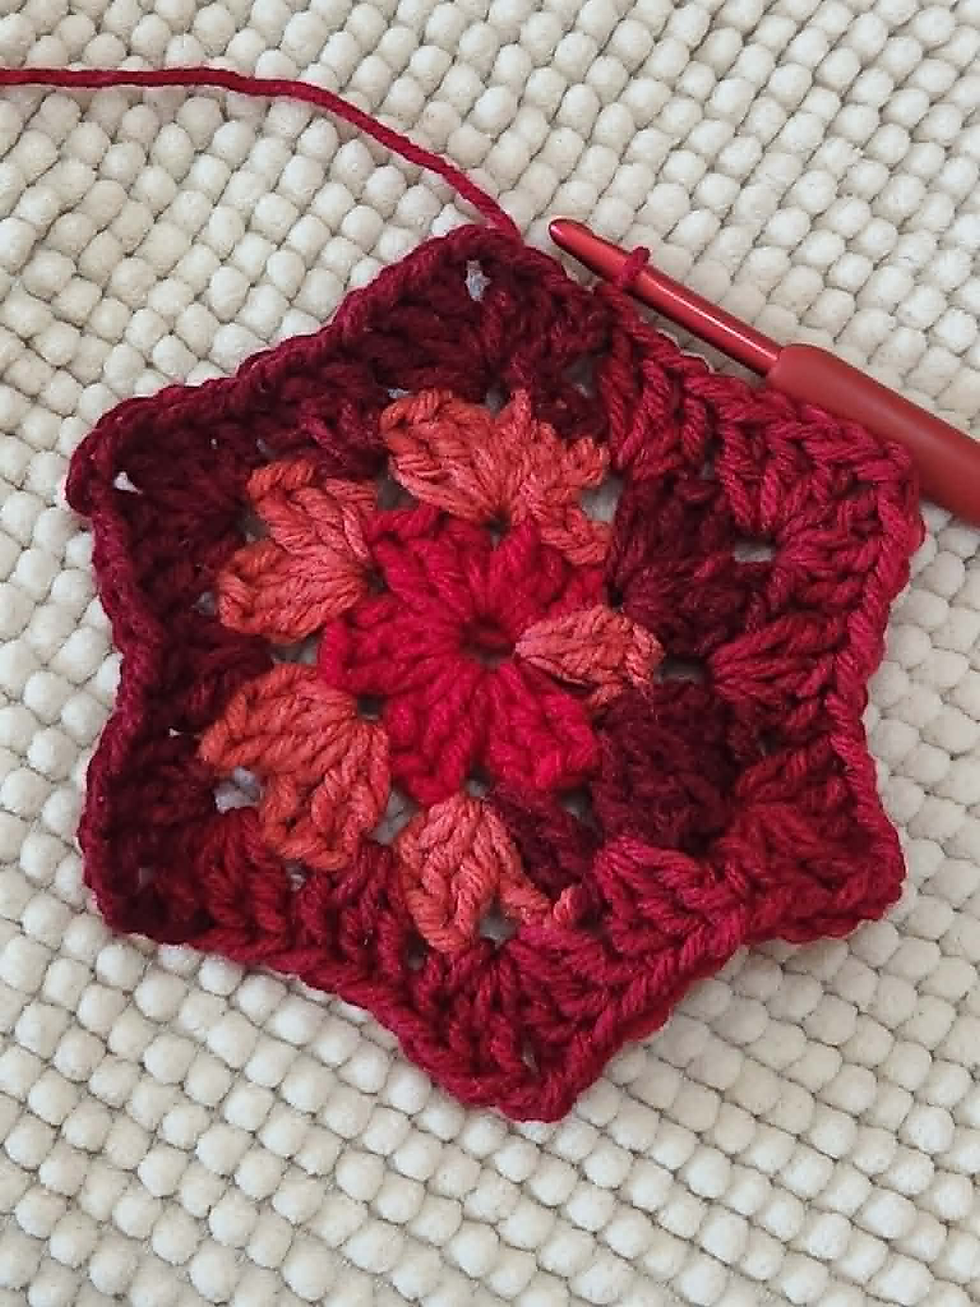
Round 4 – 18: repeat pattern; working 1 cluster into the sp between each cluster, and 1 cluster + ch 2 + 1 cluster in each corner, increasing each round by 6 clusters
Finish off – fold into L shape – I like to use st markers to hold the top corners together as pictured: set aside
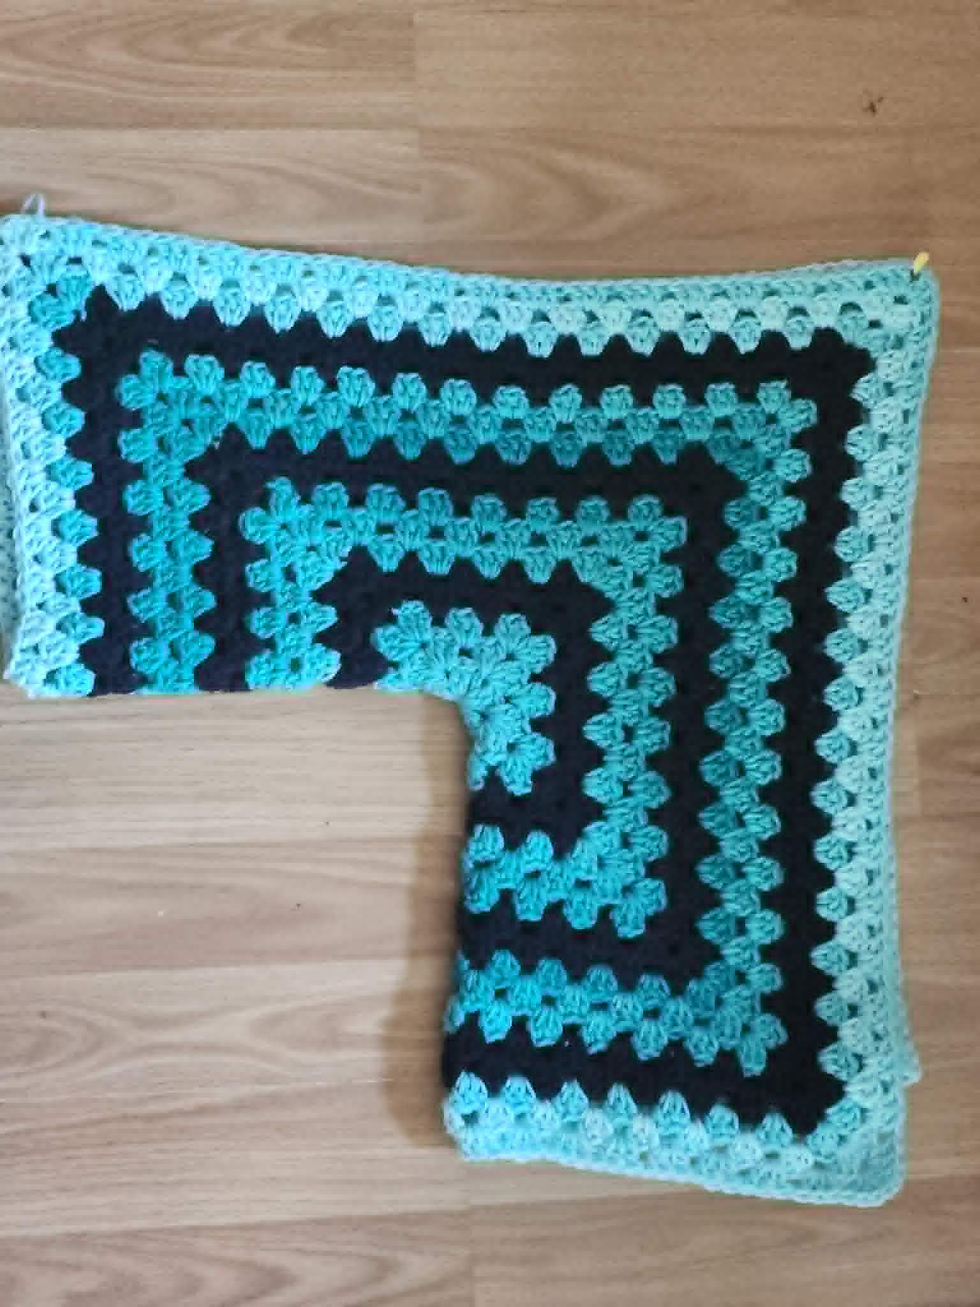
Back Panel: (4mm hook)
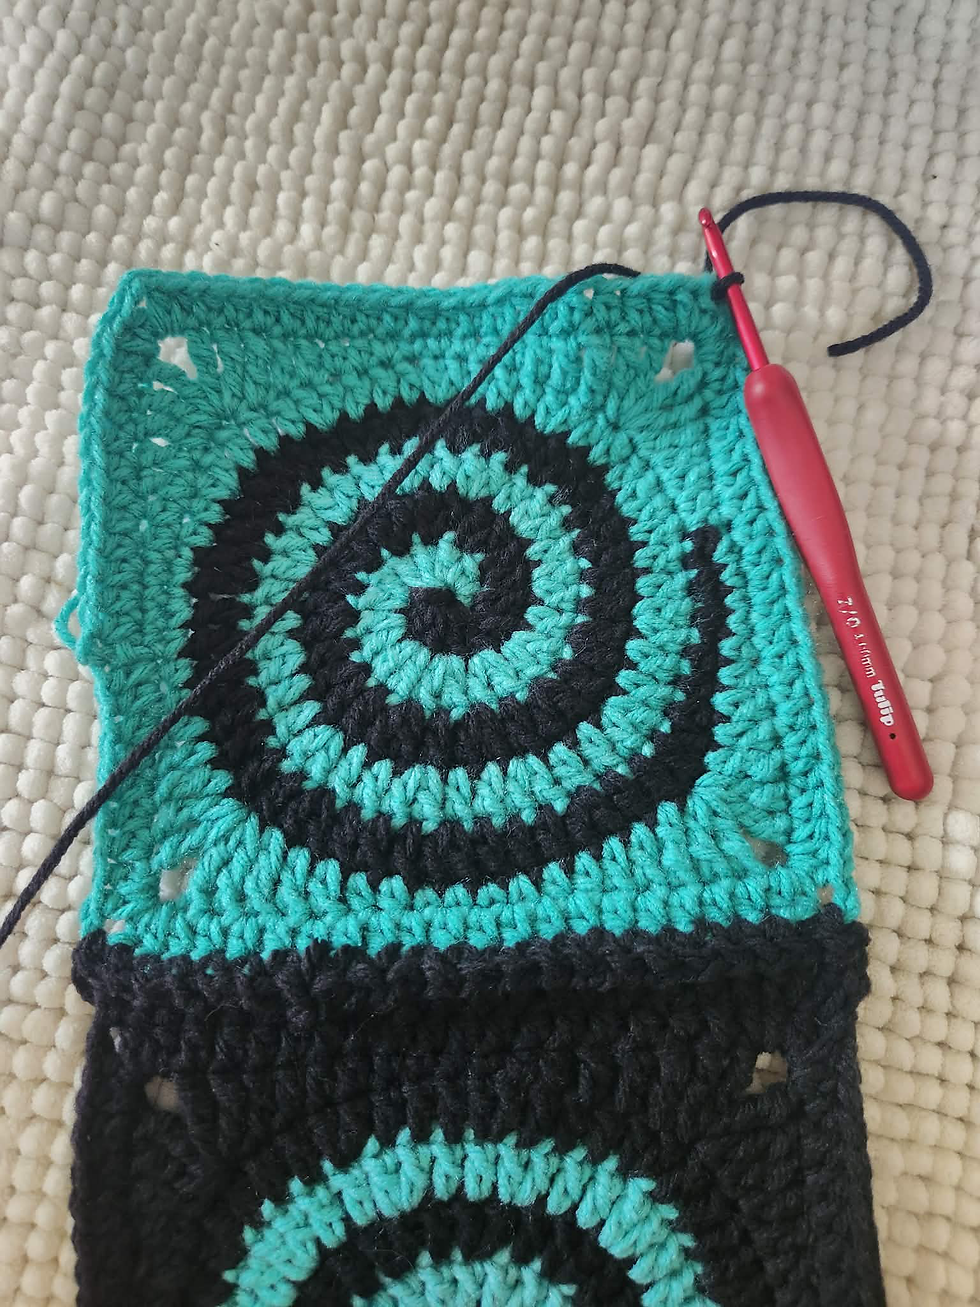
First Section: Attaching bottom square to middle square
Attach yarn to top right corner of bottom square, as pictured below:

Ch 3 (counts as first dc), sl to the bottom right corner of the middle square, as pictured below:
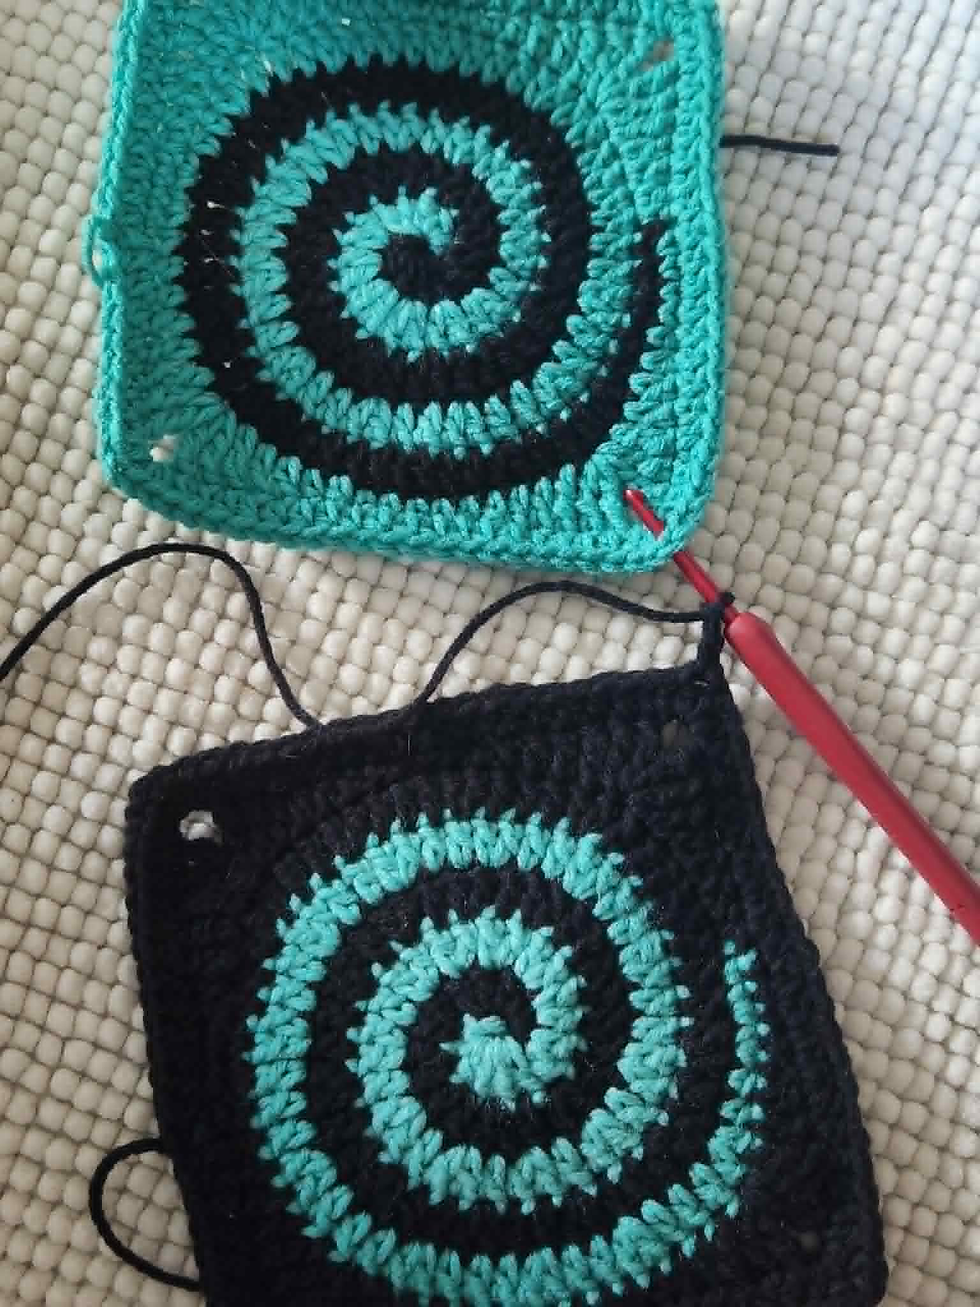
(1 dc in bottom square, 1 sl in top square) x22
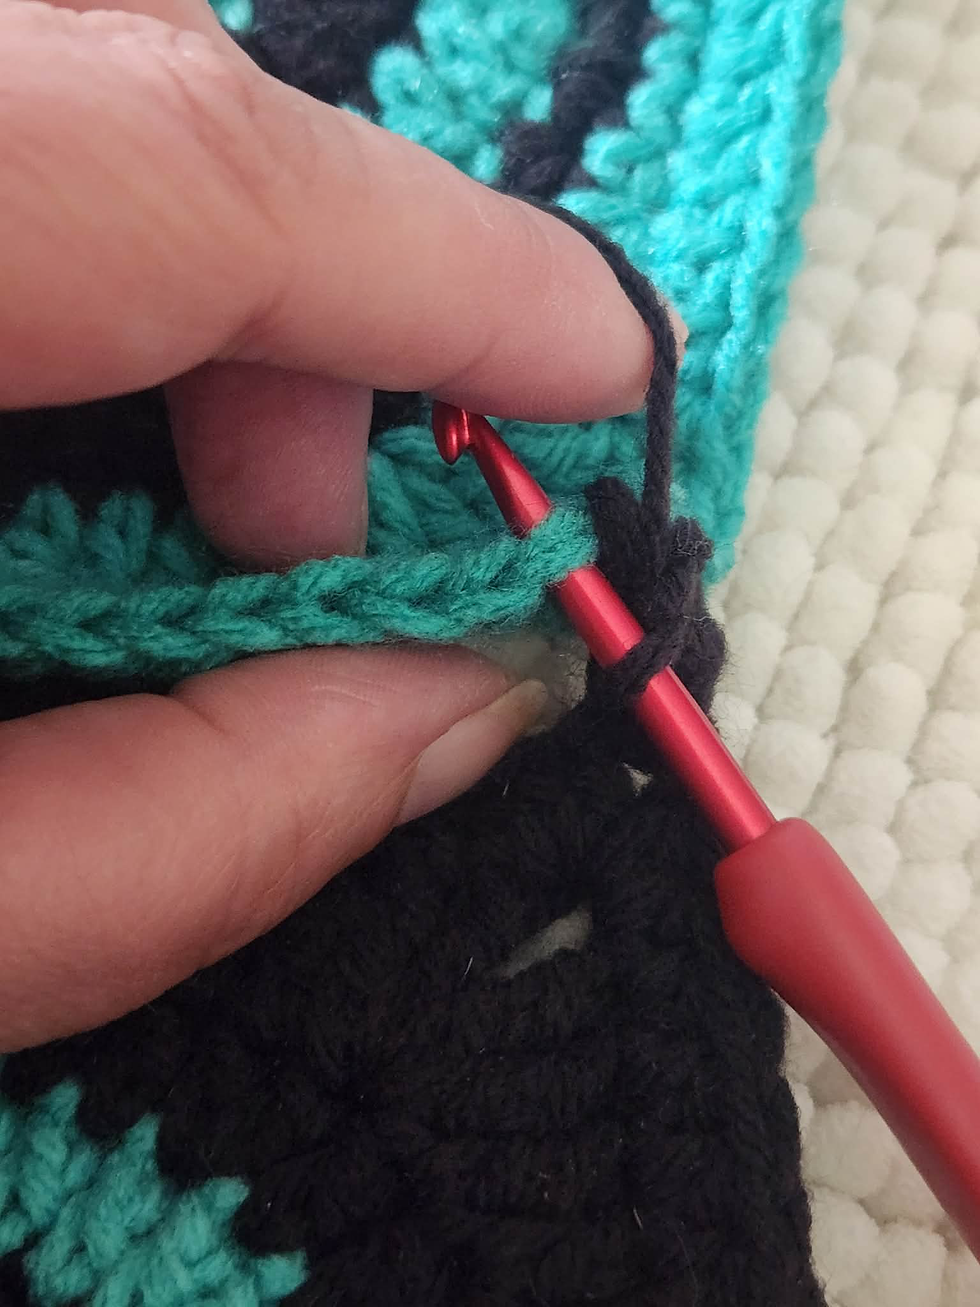
1 dc in left corner of bottom square, 1 sl in left corner of top square (24)
Finish off
Second Section: Attaching middle square to top square
Repeat instructions for first section , replacing bottom square with middle square etc, as pictured below:
Third Section:
Attach yarn to top corner of top square and ch 3 (counts as first dc), 22 dc, 1 dc in corner (24)
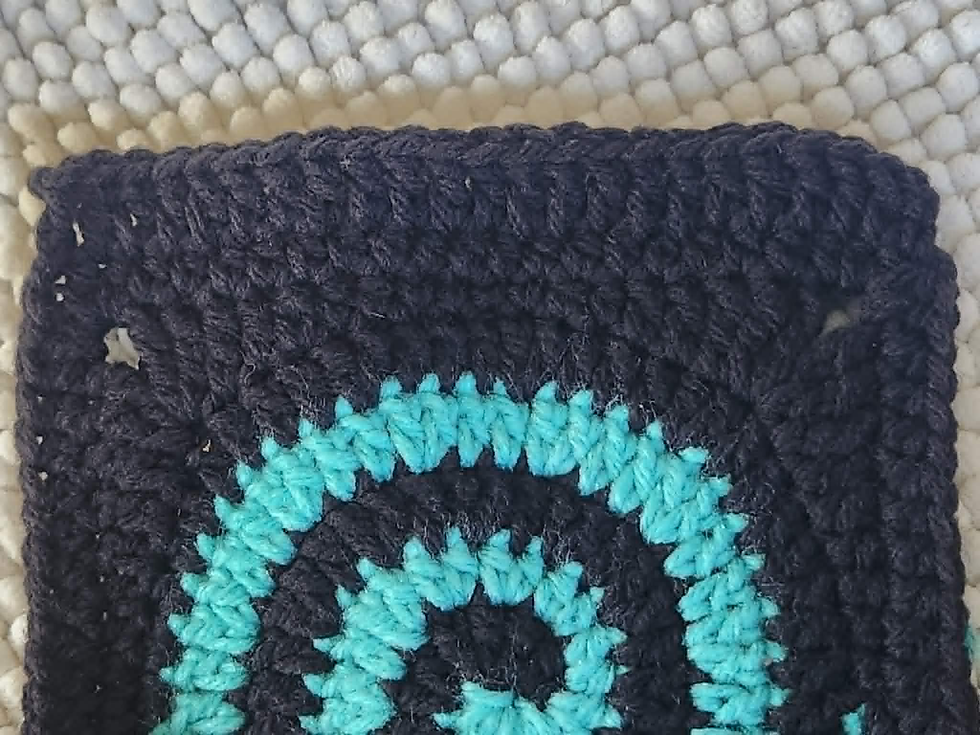
Finish off

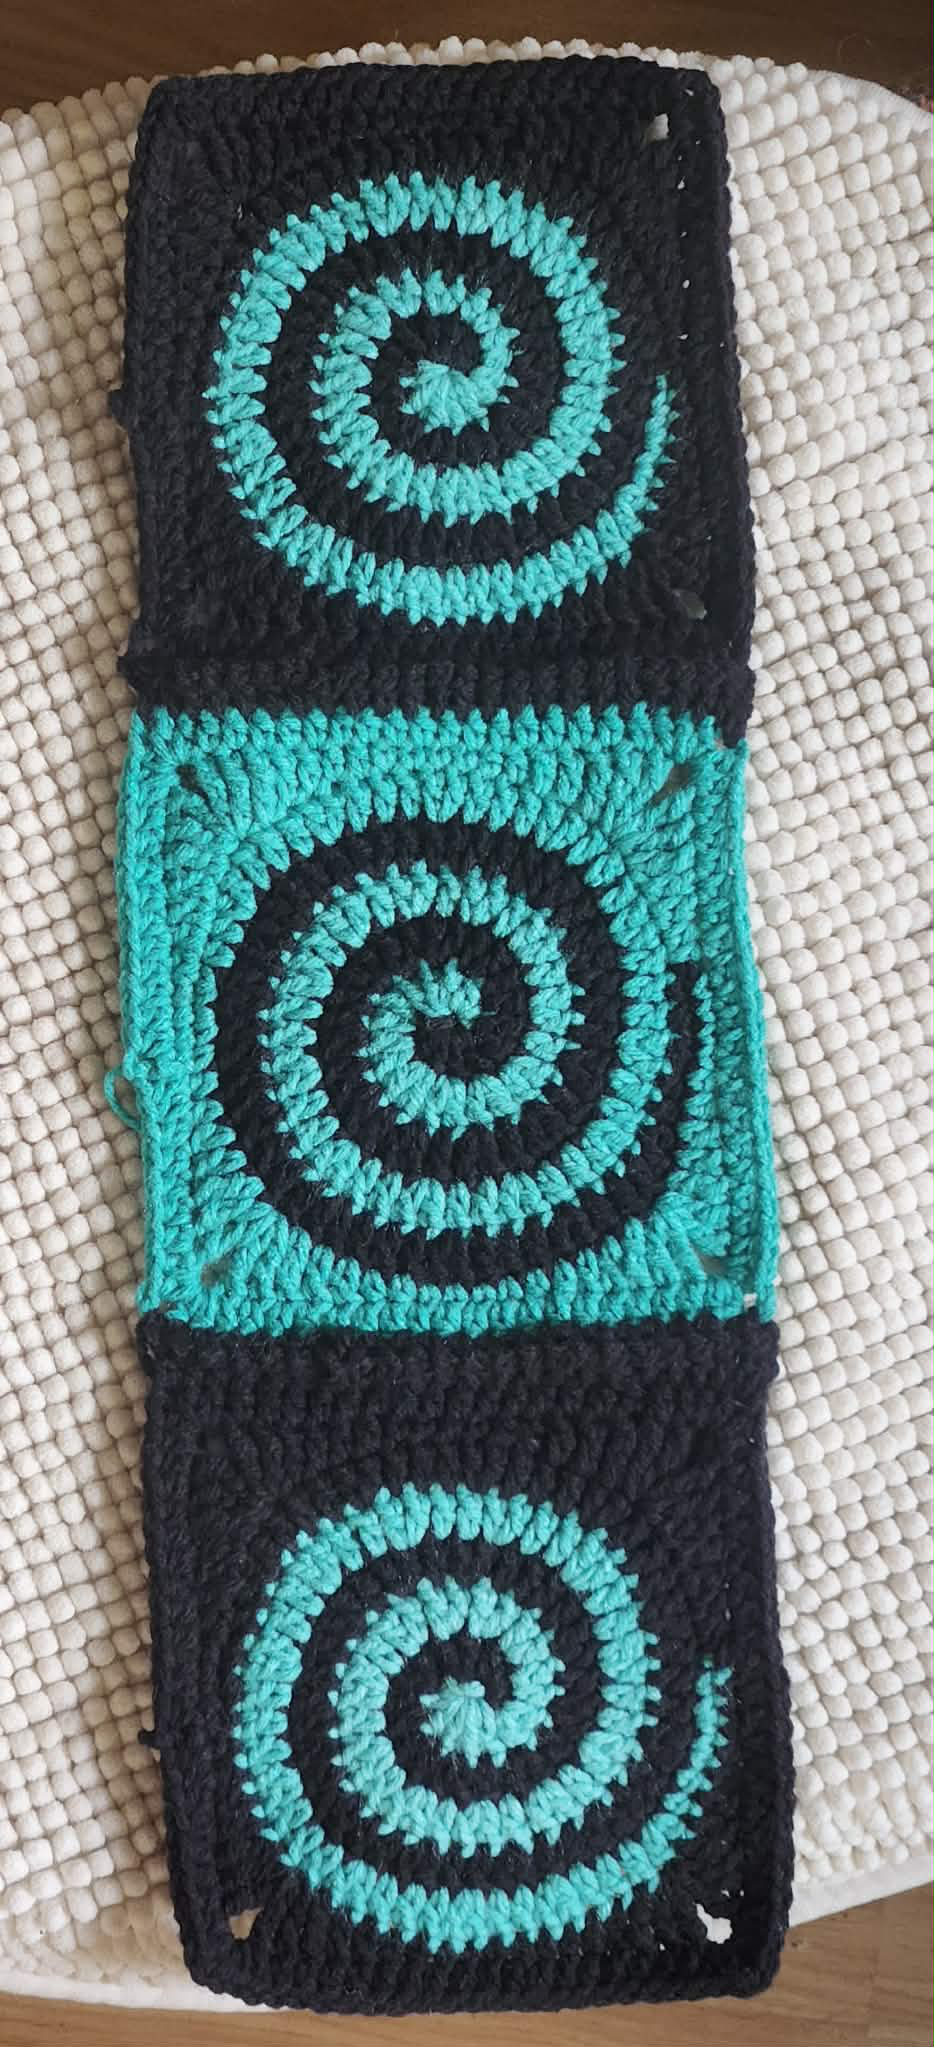
Attaching back panel to side panels: (4mm hook)
Special instructions for back panel attachment only:
Each square (including the dc row between) = 6 clusters
Entire Panel = 18 clusters
Work each st in the flo of the side panel and flo of the back panel, except when it comes to the dc rounds on the back panel join: work sc through the flo of the side panel, and around the dc post
Working a flo incr in previous st: make a flo sc like usual, then insert hook into the same
fl of the side panel, then insert hook into the fl of the next st on the back panel, draw up a loop, yo and draw through both loops
Attach yarn to bottom corner of first side panel as pictured below:
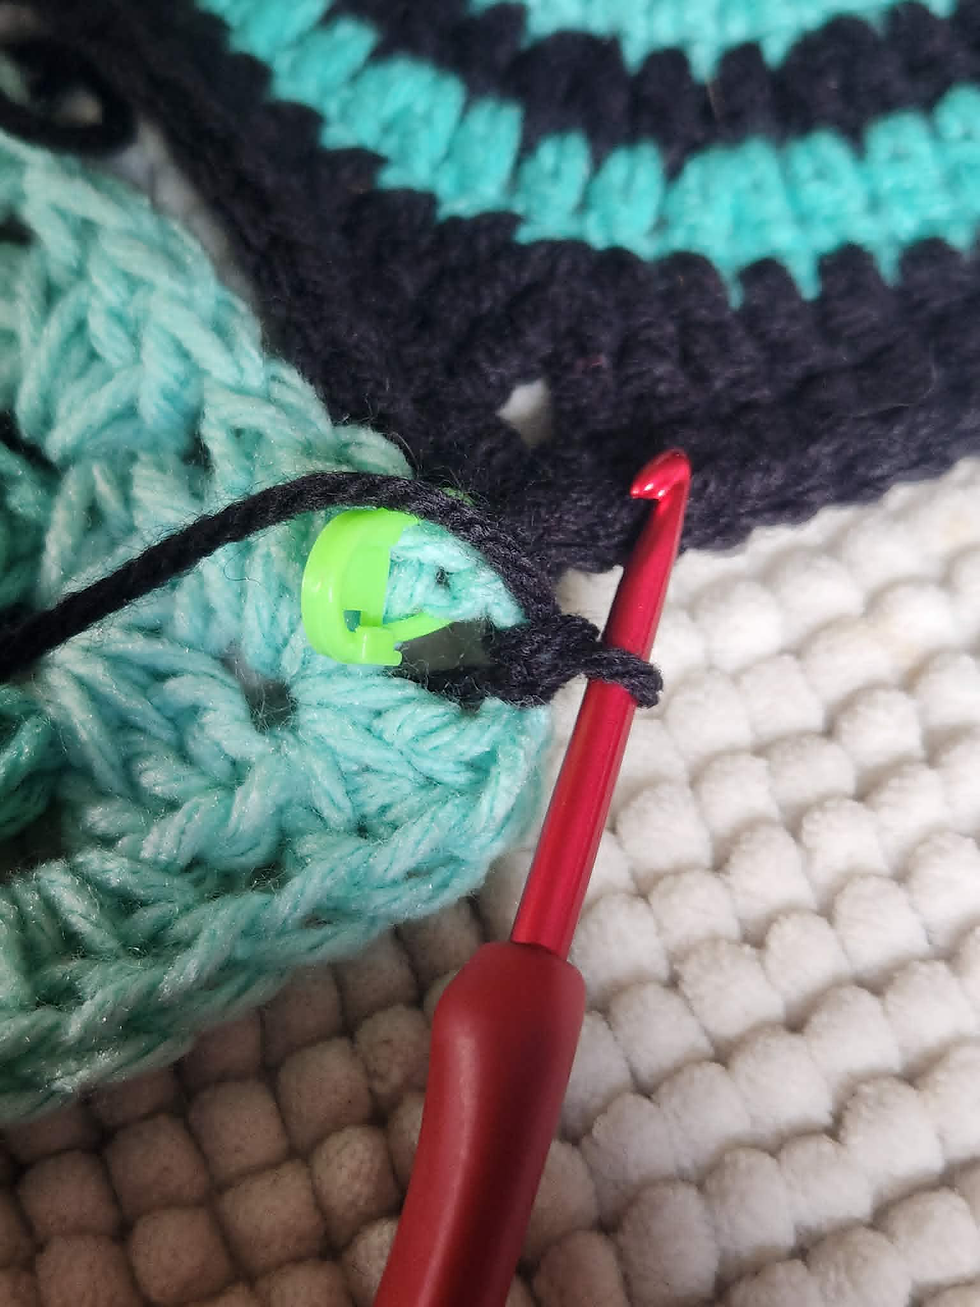
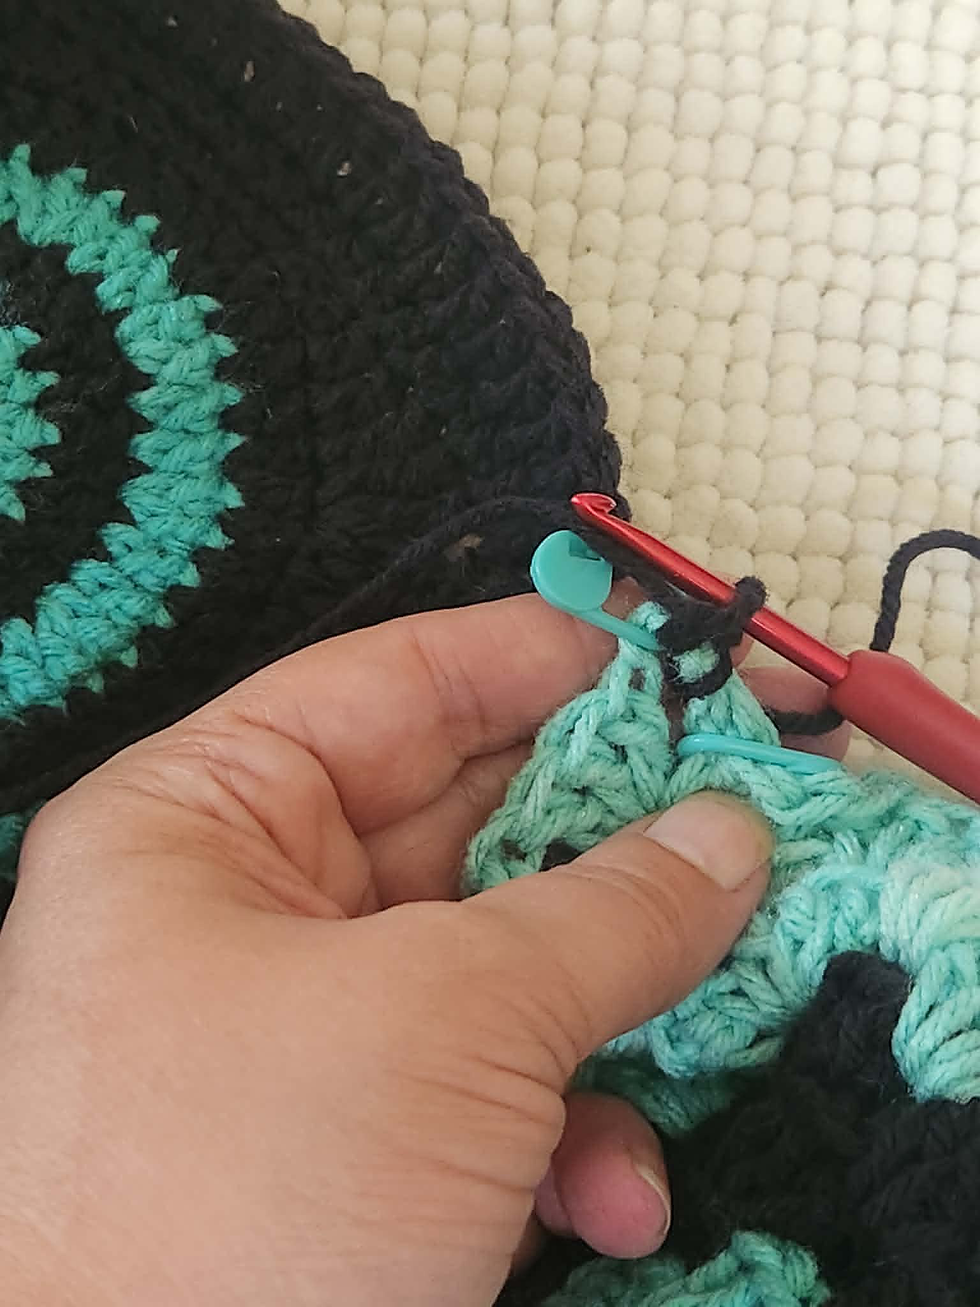
Turn your work so the back panel is horizontal, closest to you and you can work along the sides:
* 1 sc through side panel corner and back panel corner
(2 sc, flo incr in previous st) x5, 1 flo sc through next st and corner of square, 2 flo sc around post of the dc row on back panel, 1 sc in the sp between next clusters and the sl join of the back panel *
Repeat to x3
Finish off

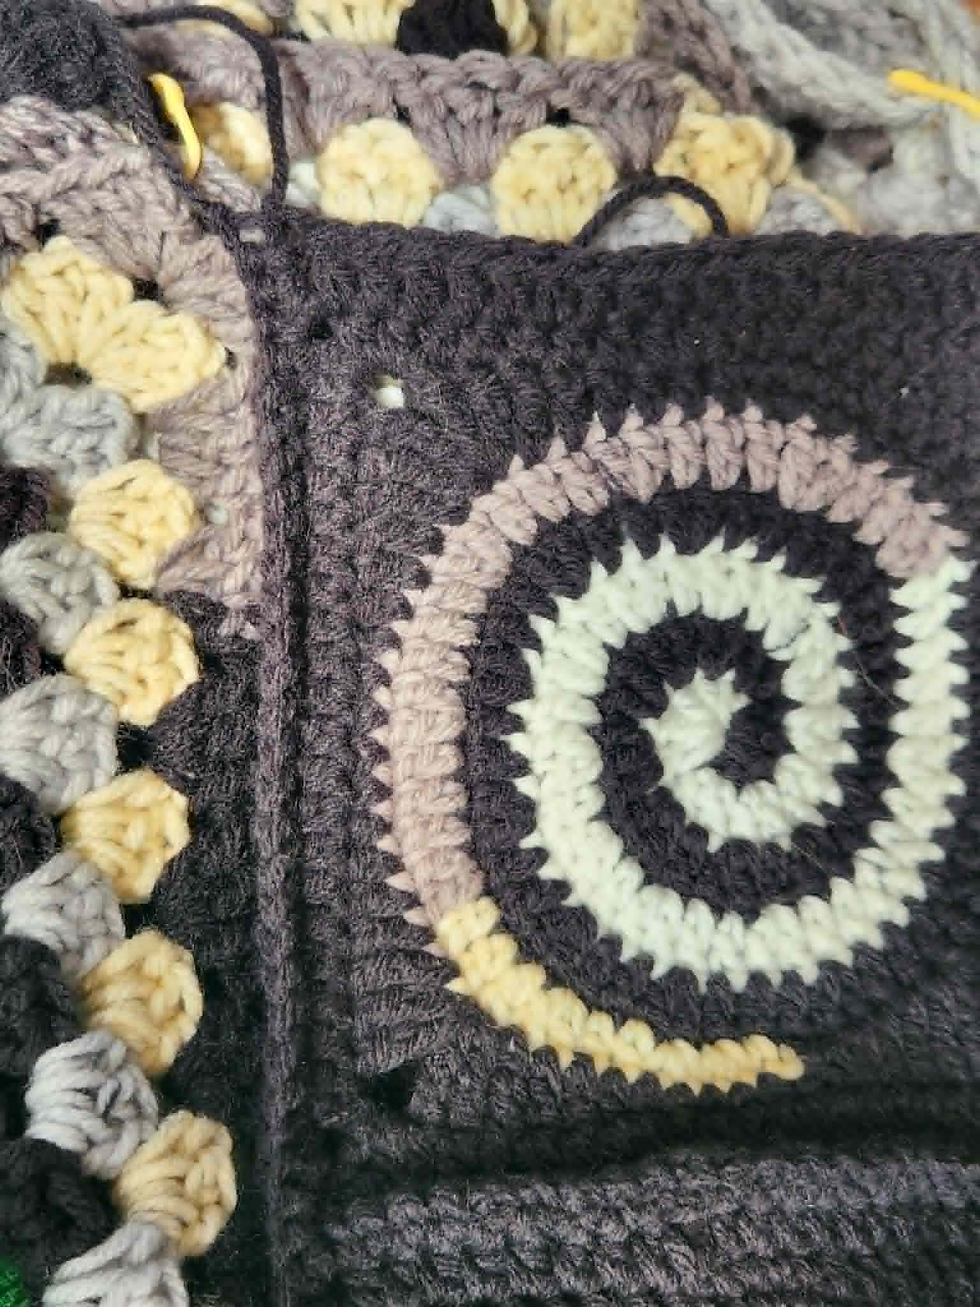
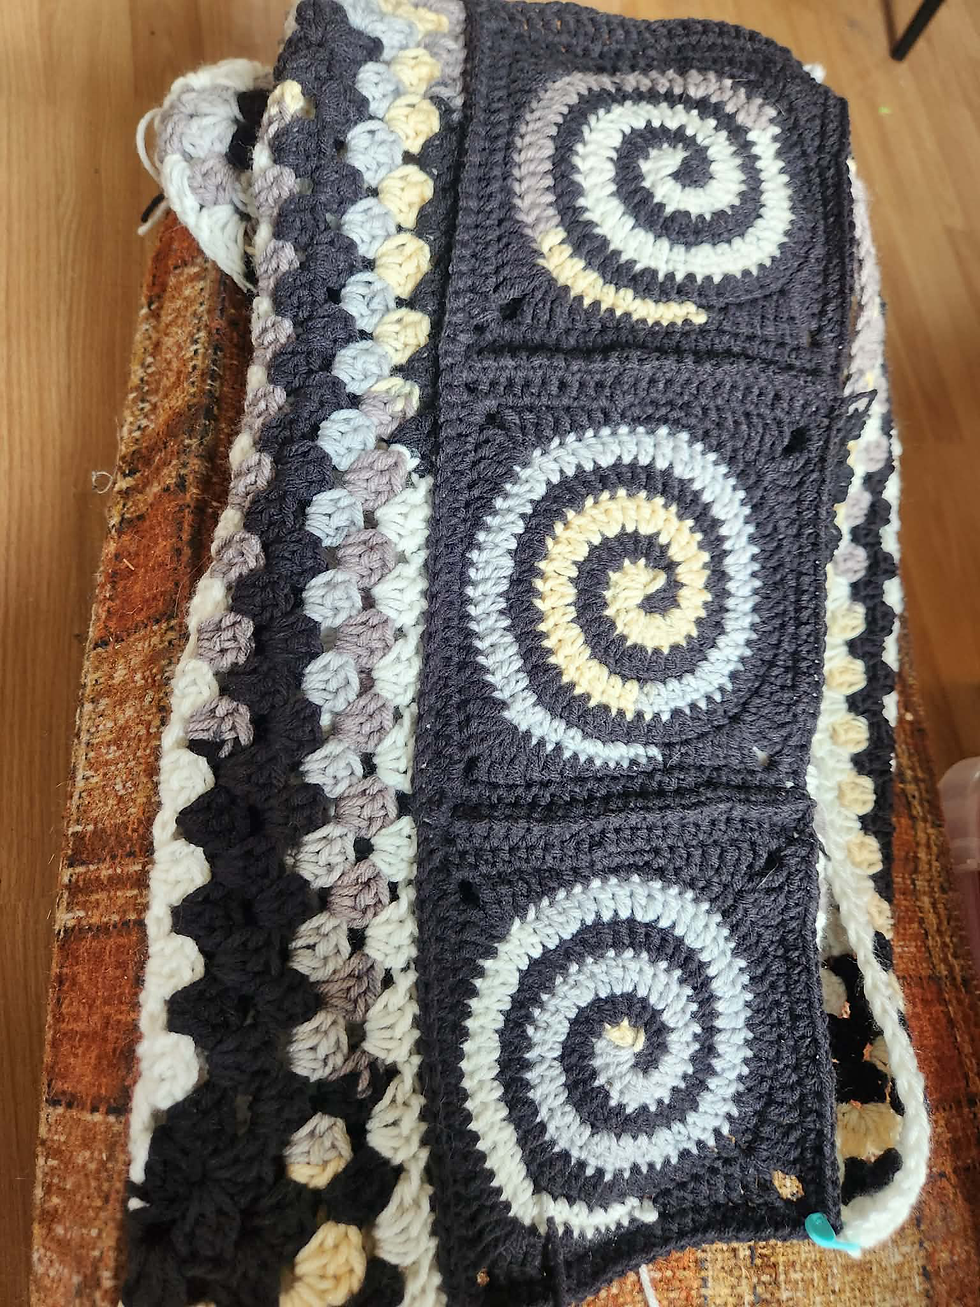
Turn and work top down to attach 2nd side panel to back panel
Attach yarn to top corner of side panel as pictured below:
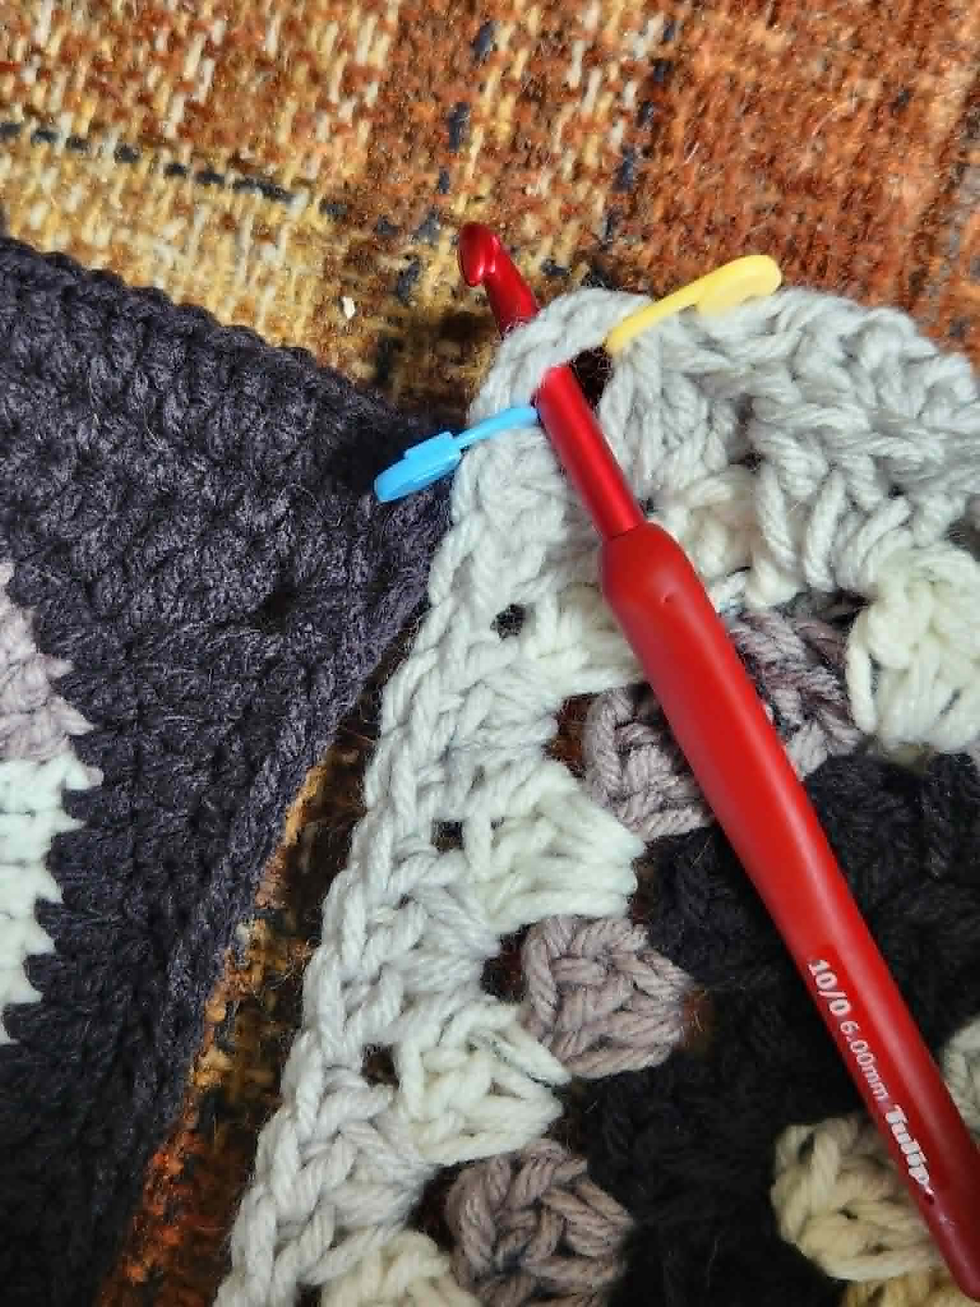
1 sc through side panel corner and back panel corner
*3 flo sc around post of the dc row on back panel, 1 sc in the sp between next cluster and the corner of the square,
(2 sc, flo dec in previous st) x5, 1 sc in the sp between next cluster and the corner of the square *
Repeat to x3
Finish off
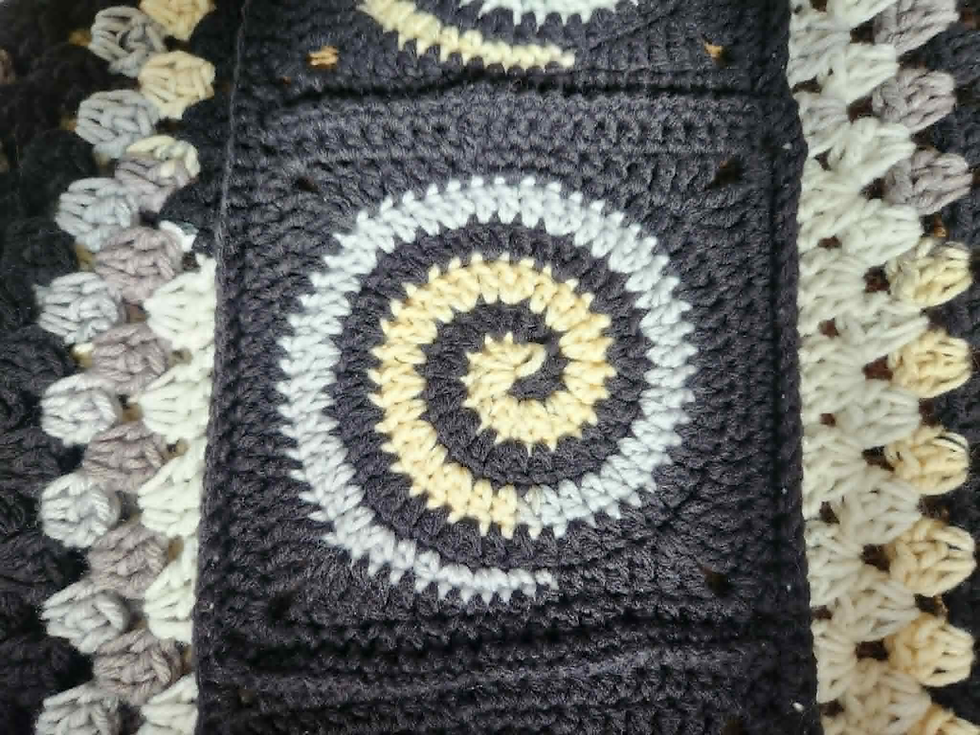

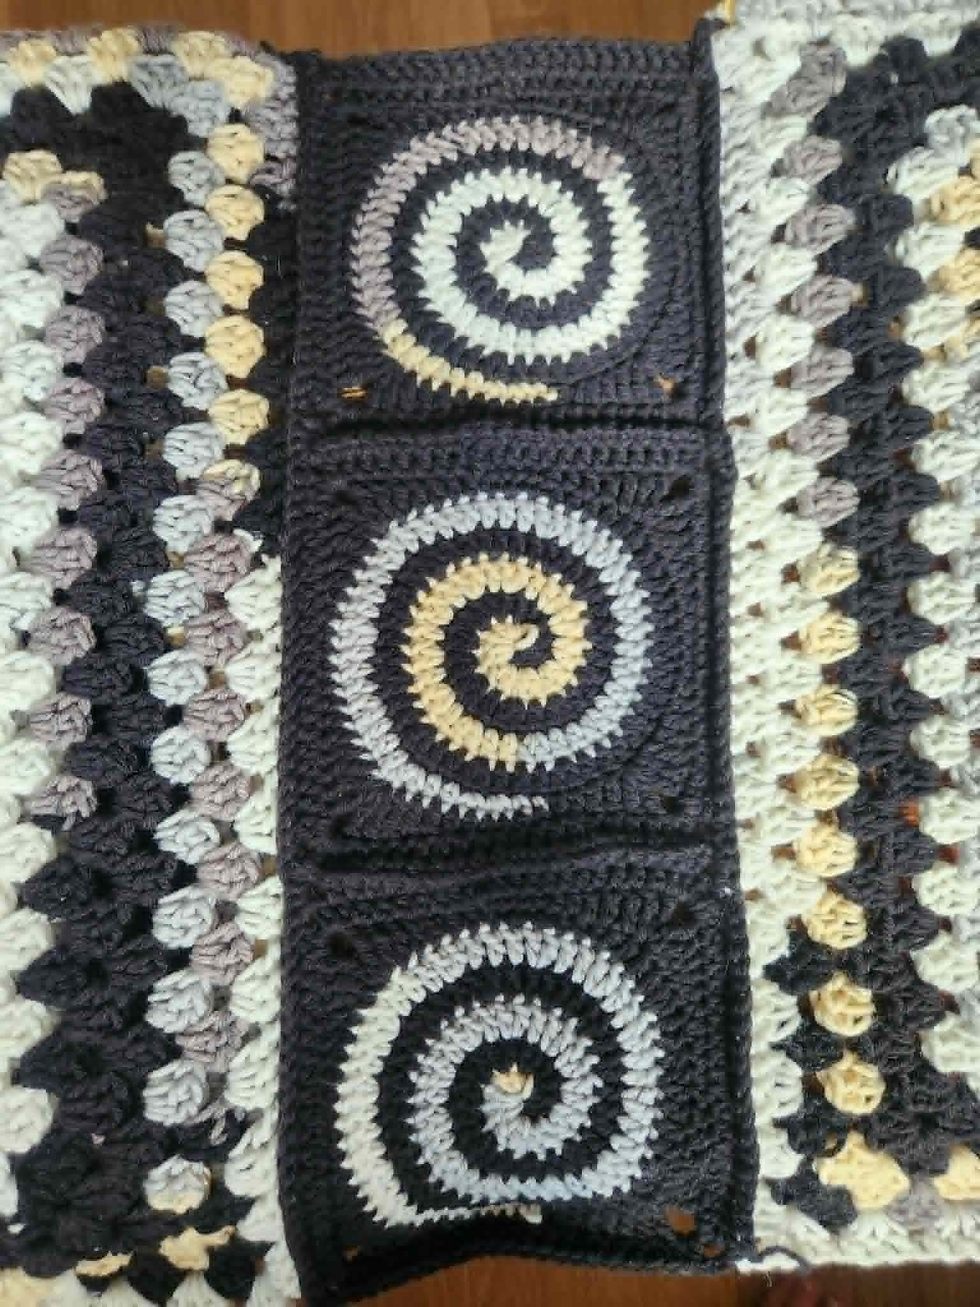
Closing the Sleeves: (6mm hook)
Attach yarn to corner sp of sleeve, as pictured below:
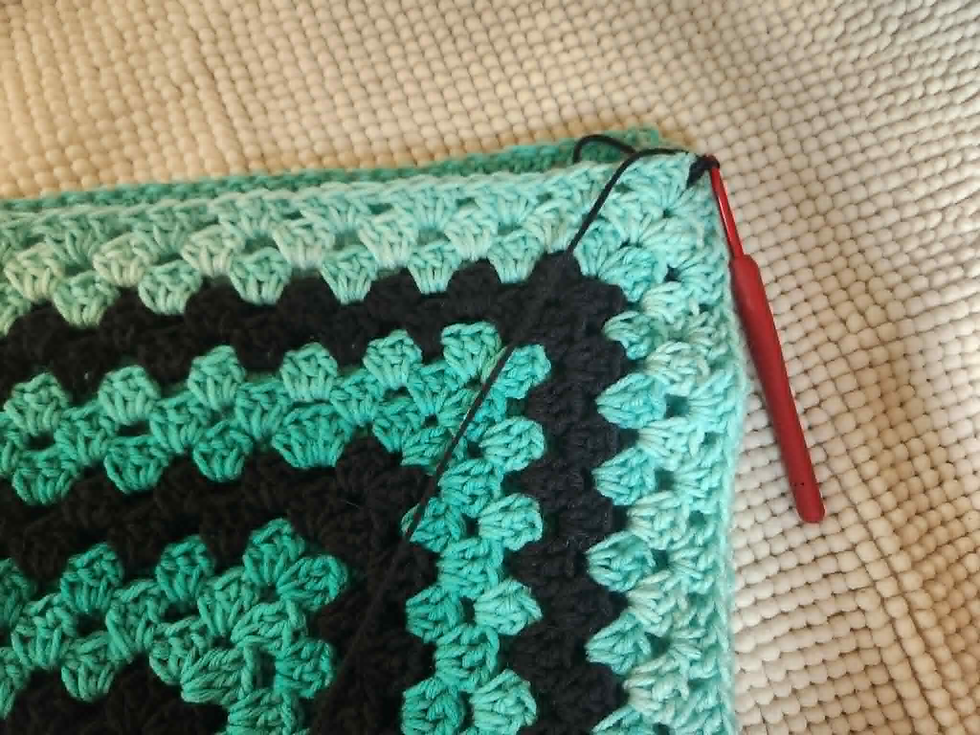
Row 1: Ch 3, 2 dc in same sp, work 3 dc in each sp until you reach the next corner (19 clusters)
Turn your work so you can now work back down the other side
*** When joining the sides of the sleeves, you will work back and forth between them, 3 dc on the side closest to you, then 1 sc on the side furthest from you ***
Row 2: 3 dc in the corner sp, (1 sc in the next sp on the further side, 3 dc in the next sp on the closer side) x 18, 1 sc in the top of the starting ch 3 (19 clusters, 19 sc)

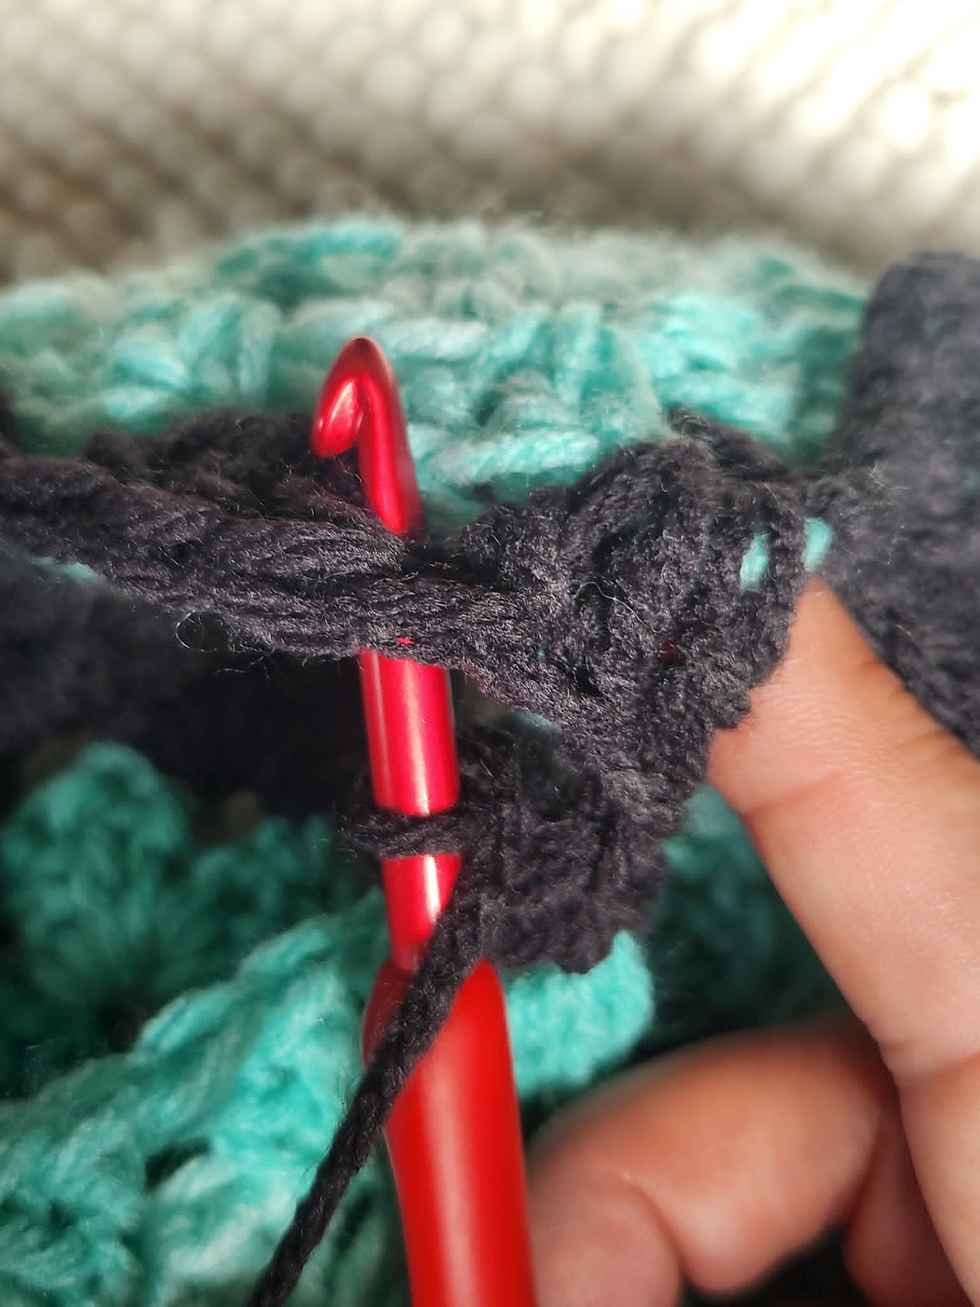
Finish off


Finishing the Back Panel: (6mm hook)
When you have closed both sleeves, you will see there is a space between them above the squares on the top as pictured below:
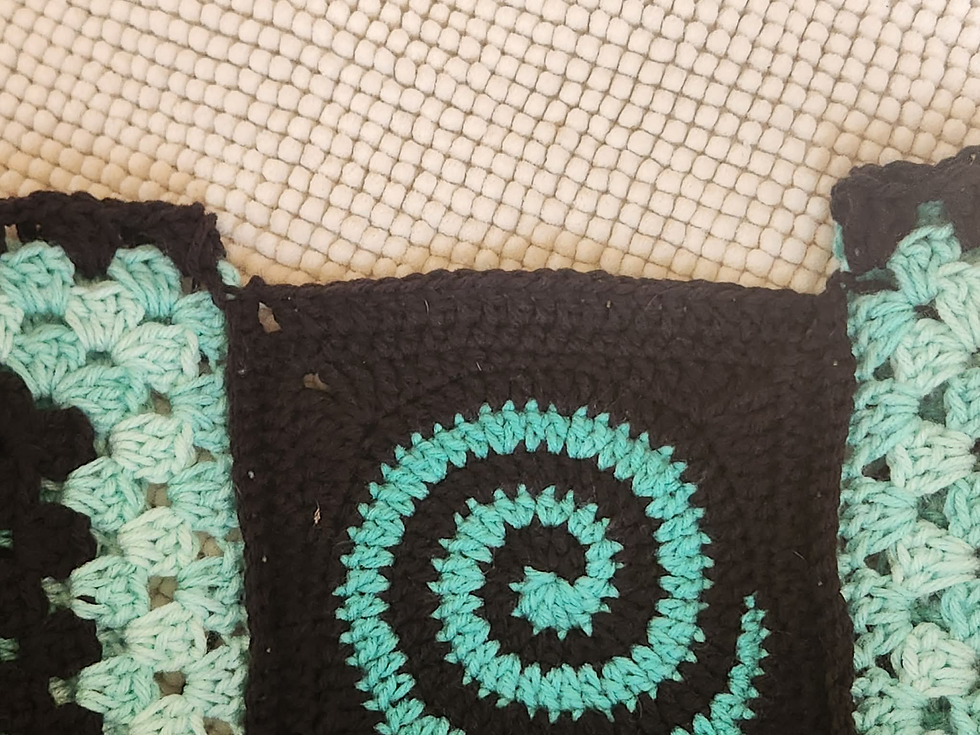
Attach yarn to first st on the square:
Ch 3 (counts as first dc), sl to the sleeve join as pictured below:
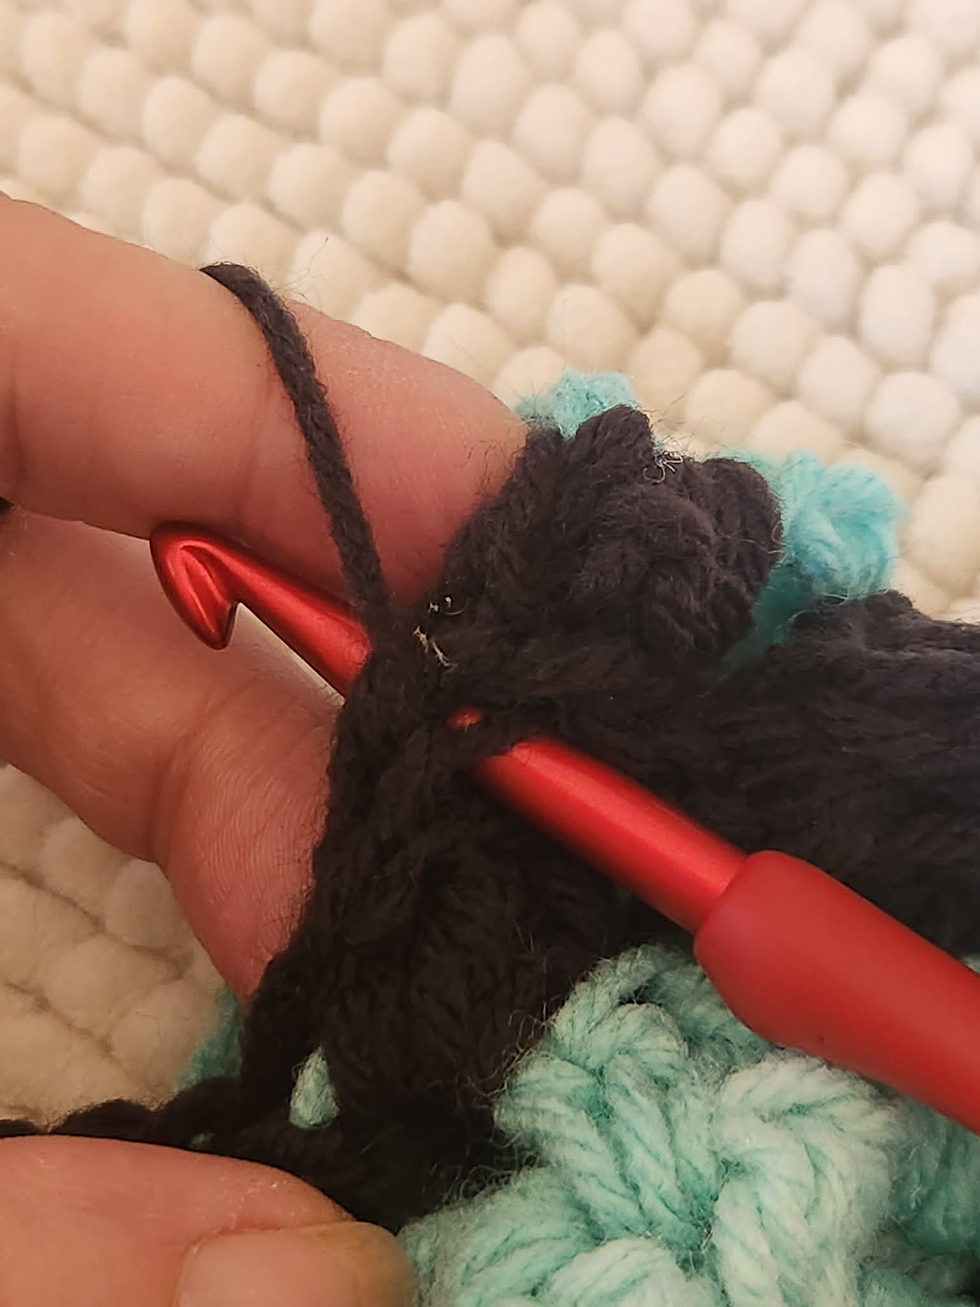
2 dc in the same st, (sk 3 st, 3 dc in next) x5, sl to the sleeve join as pictured
Finish off
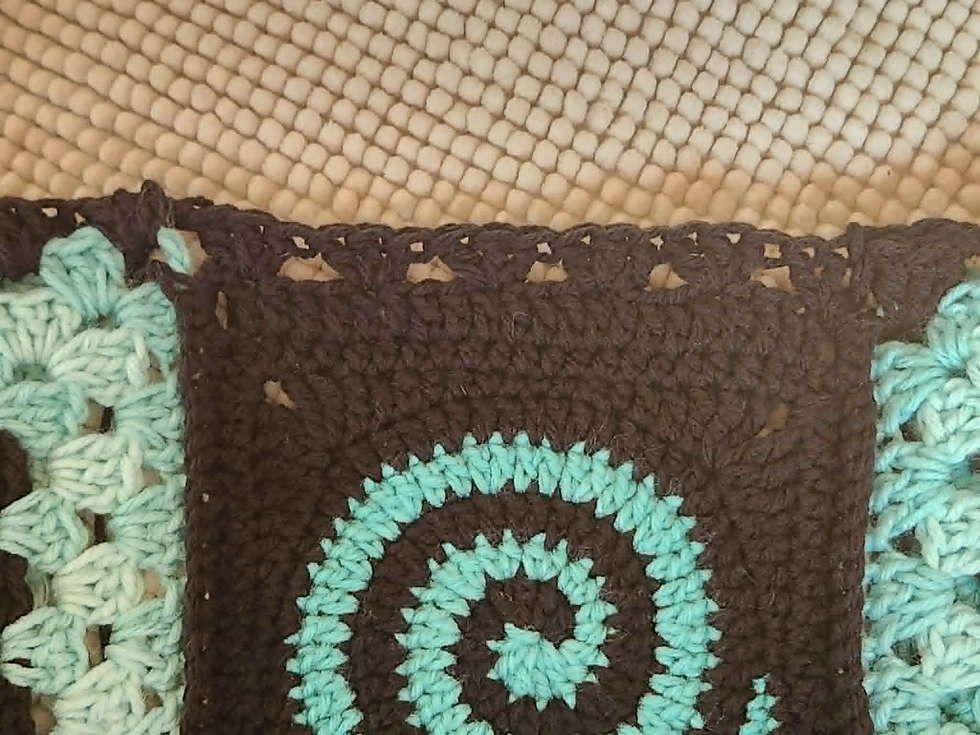
Extending the Length and Around:
Turn your work upside down so you can work along the bottom and attach yarn to the bottom corner of the first panel beside the square, as pictured below:
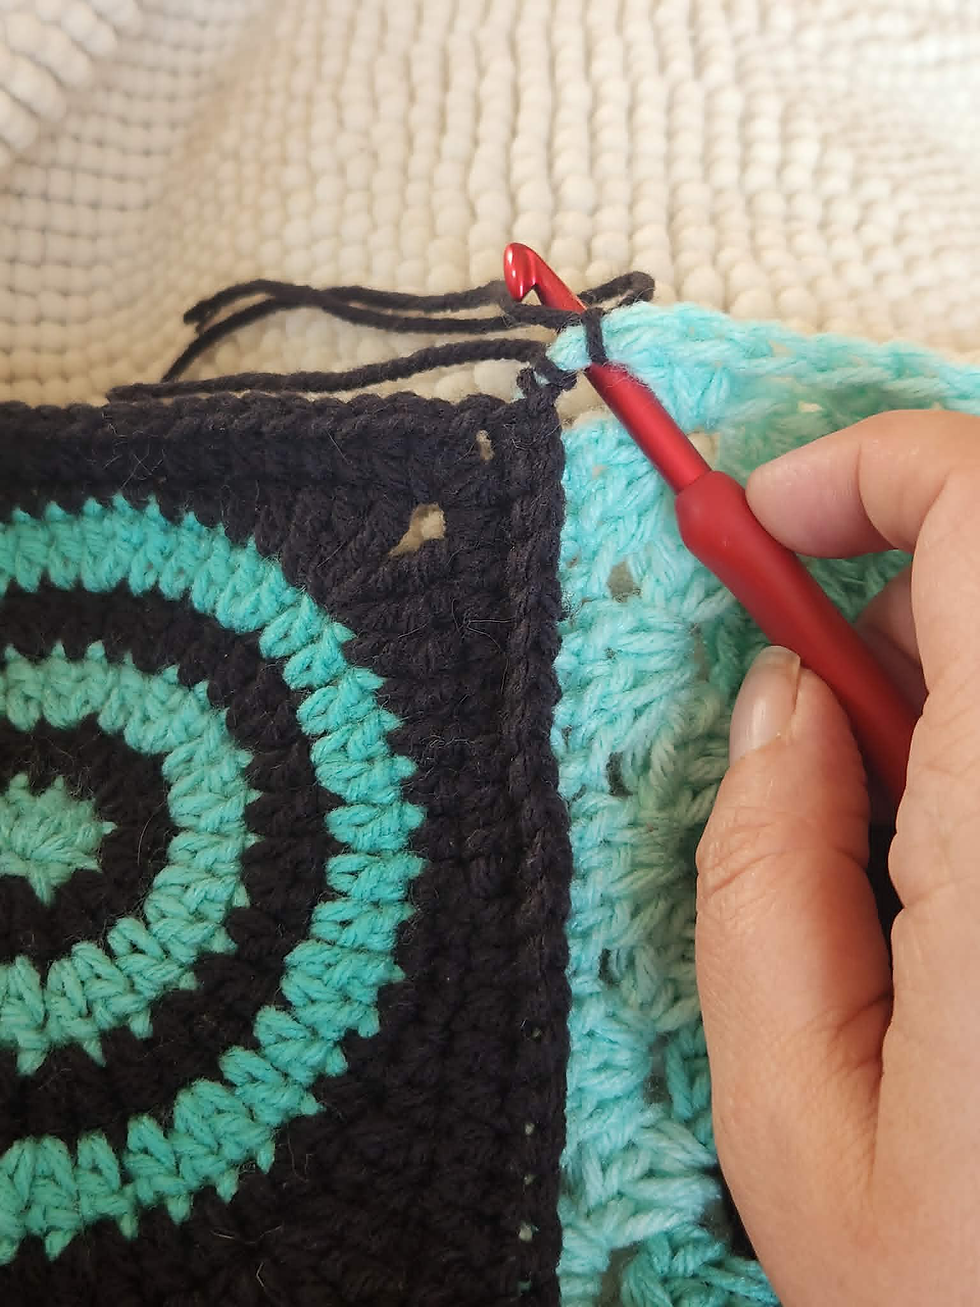
*** do not work into the corner sp of the squares ***
Round 1: Ch 3, 2 dc in the same corner space of the side panel, 3 dc in the first st on the square after the corner, as pictured below:
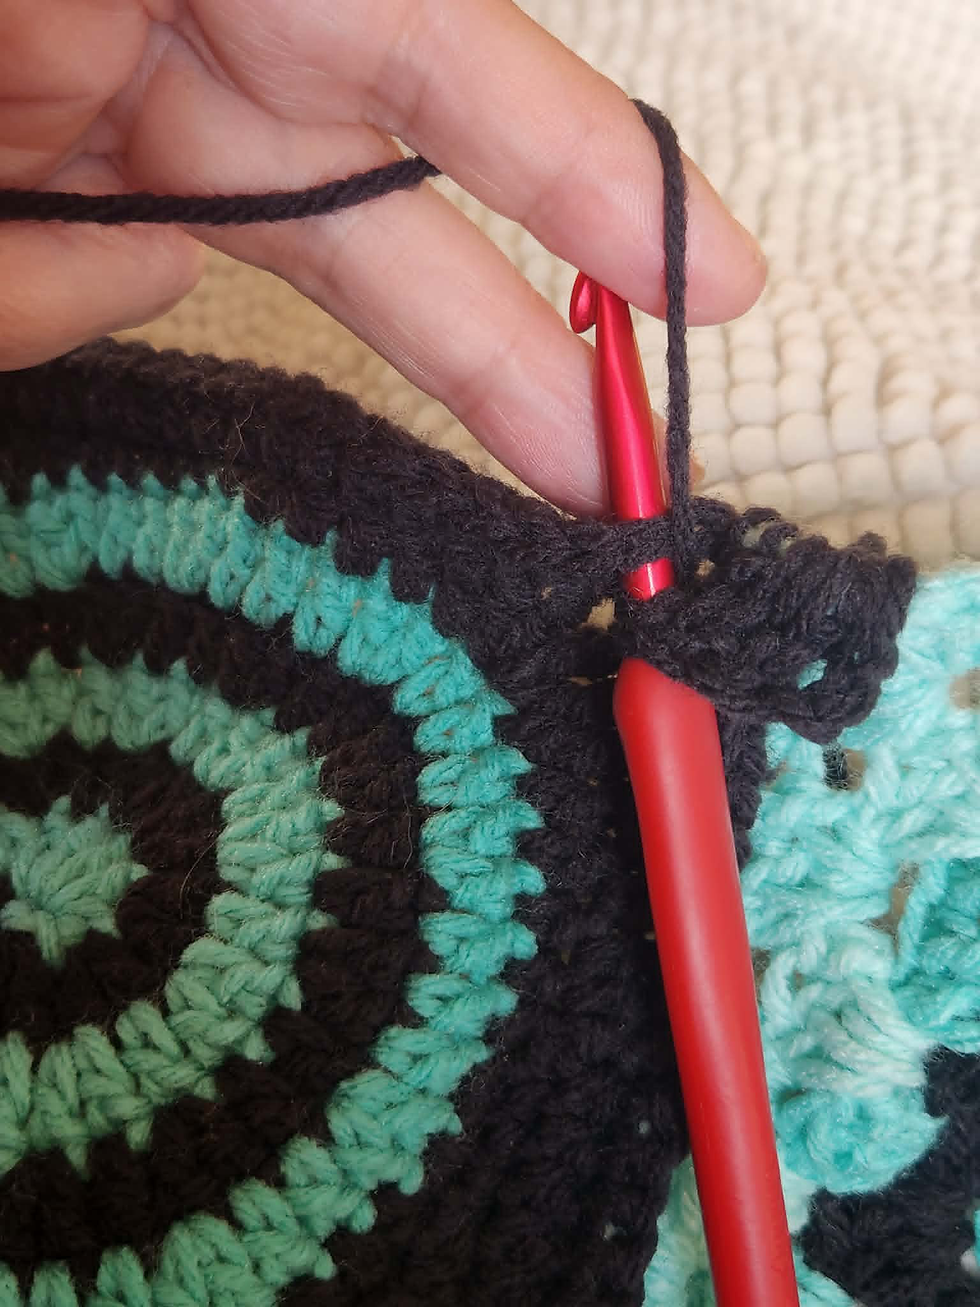
(sk 3 st, 3 dc in the next st) x6, 3 dc in the corner of the side panel
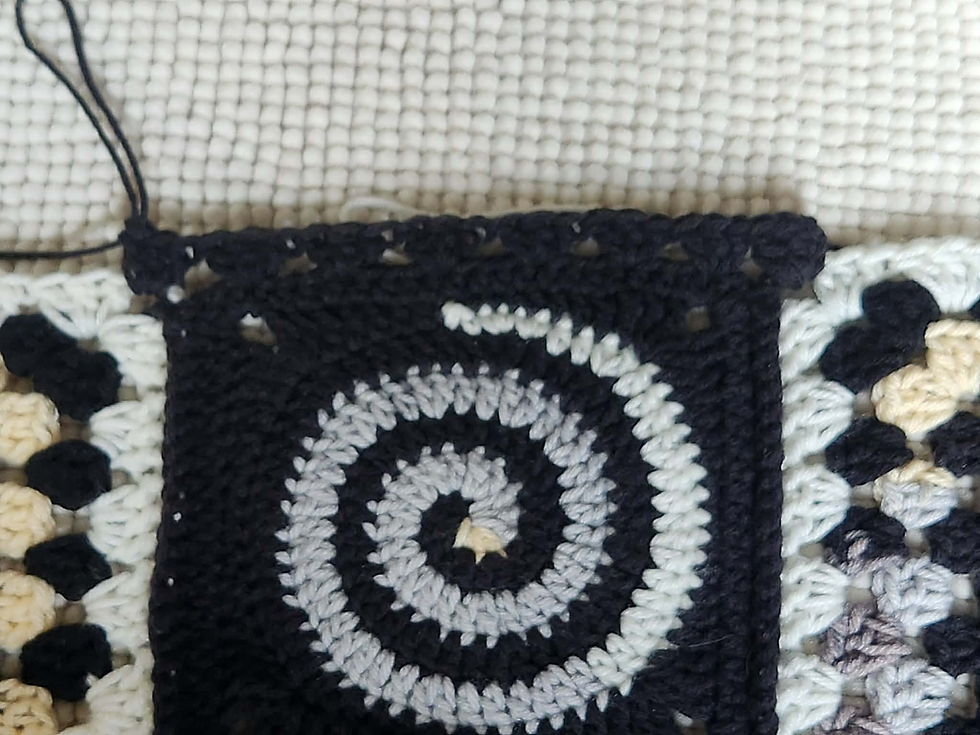
work 3 dc in each sp until you reach the corner, 3 dc + ch 2 + 3 dc in the corner,
working up the front: 3 dc in each sp until you reach the sleeve join as pictured below:
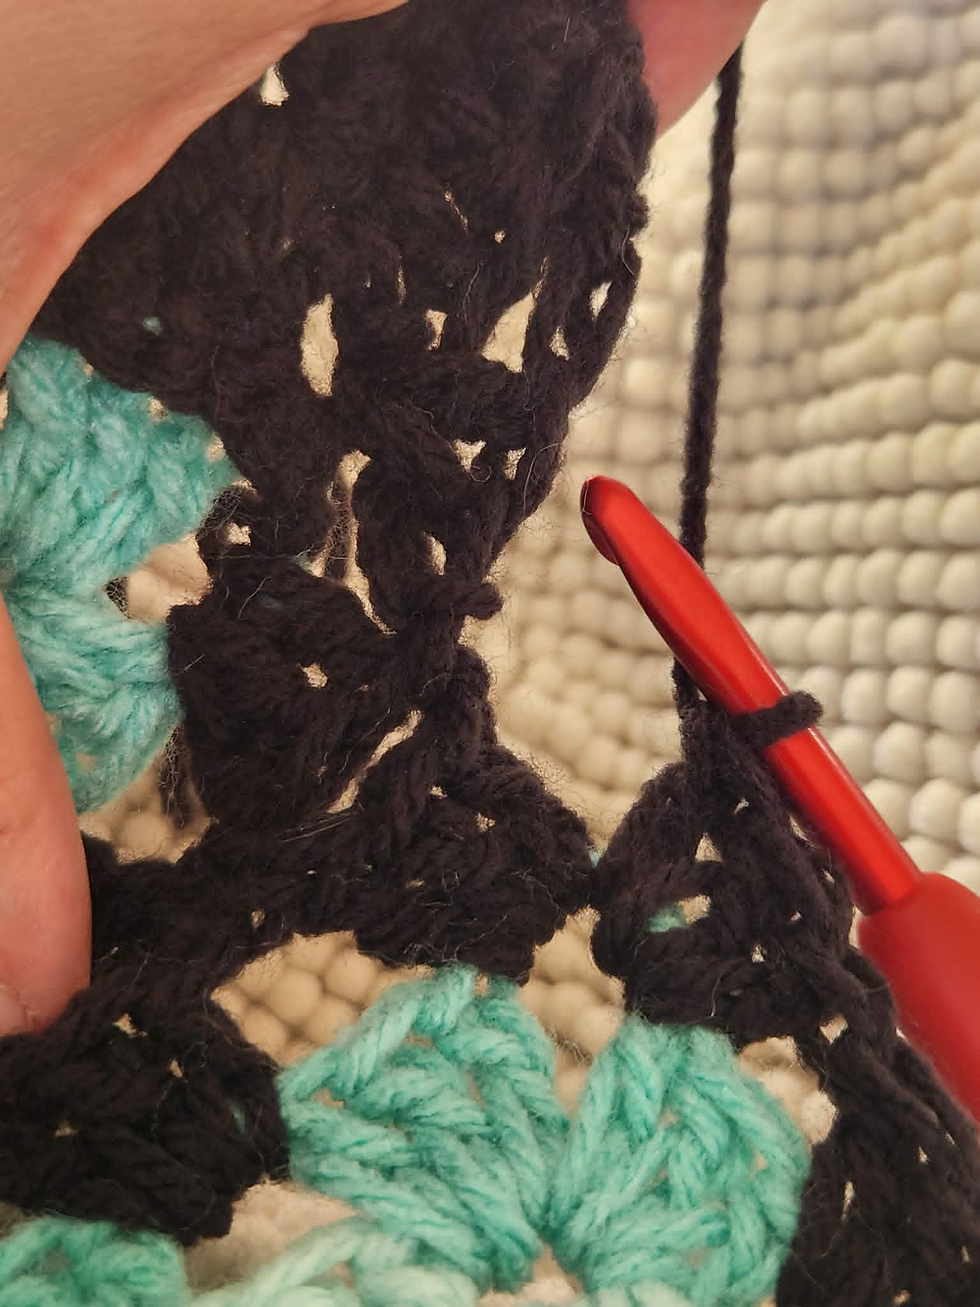
Sk the sp created by the sleeve join, sk the next sp as well, 3 dc in the next 5 sp, sk the next
two sp, 3 dc in each sp until you reach the corner, 3 dc + ch 2 + 3 dc in the corner, working along the bottom: 3 dc in each sp until you reach the end, sl to the top of ch 3 to join, sl to the next sp (87 clusters)
Round 2: ch 3, 2 dc in the same sp, work 3 dc in each sp until you reach the corner, 3 dc + ch 2 + 3 dc in the corner, 3 dc in each sp until you reach the last sp before the 5 clusters on the back of the neck as pictured below:
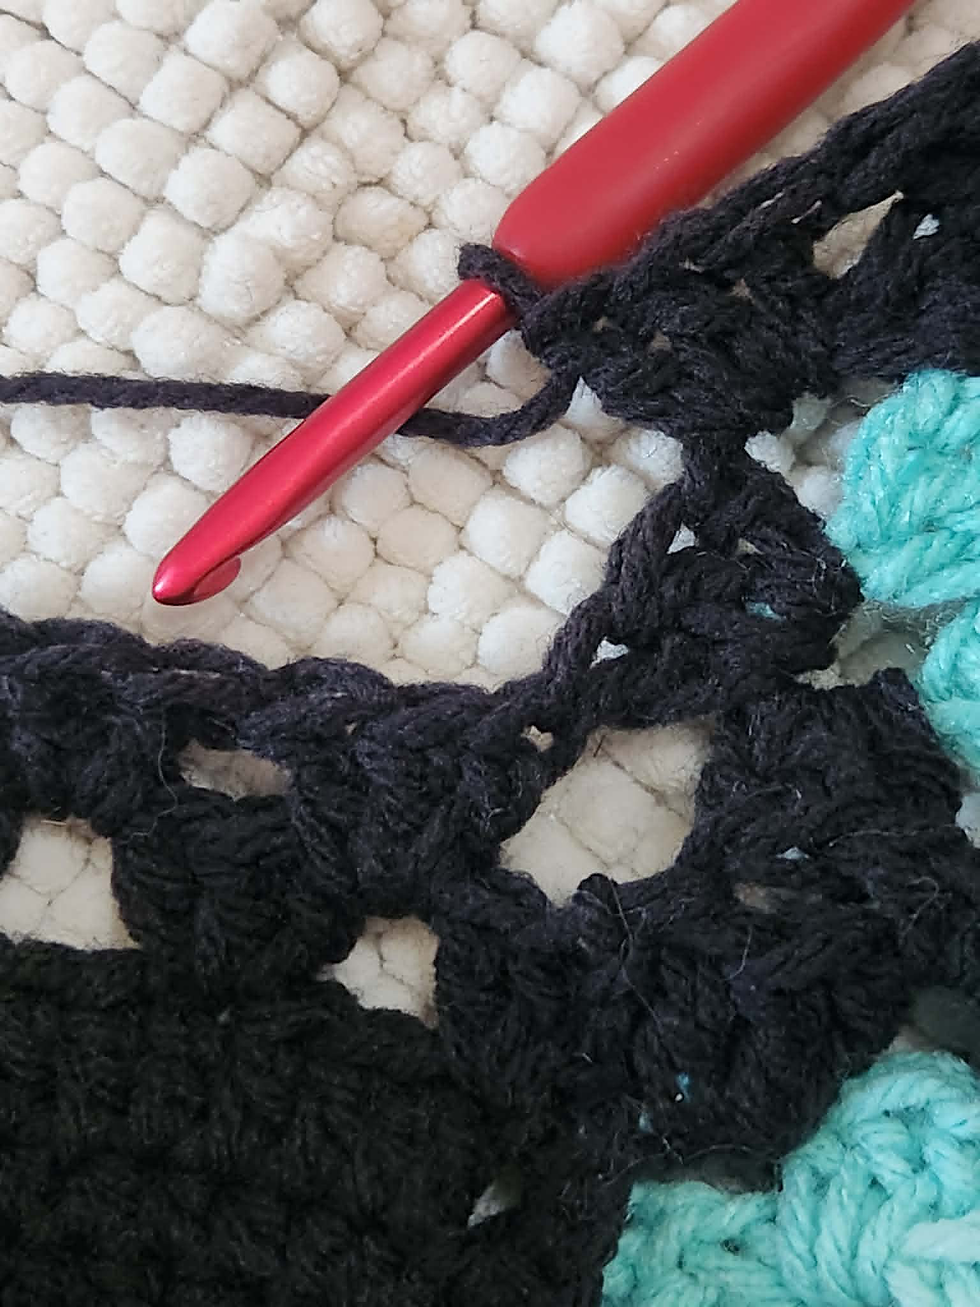
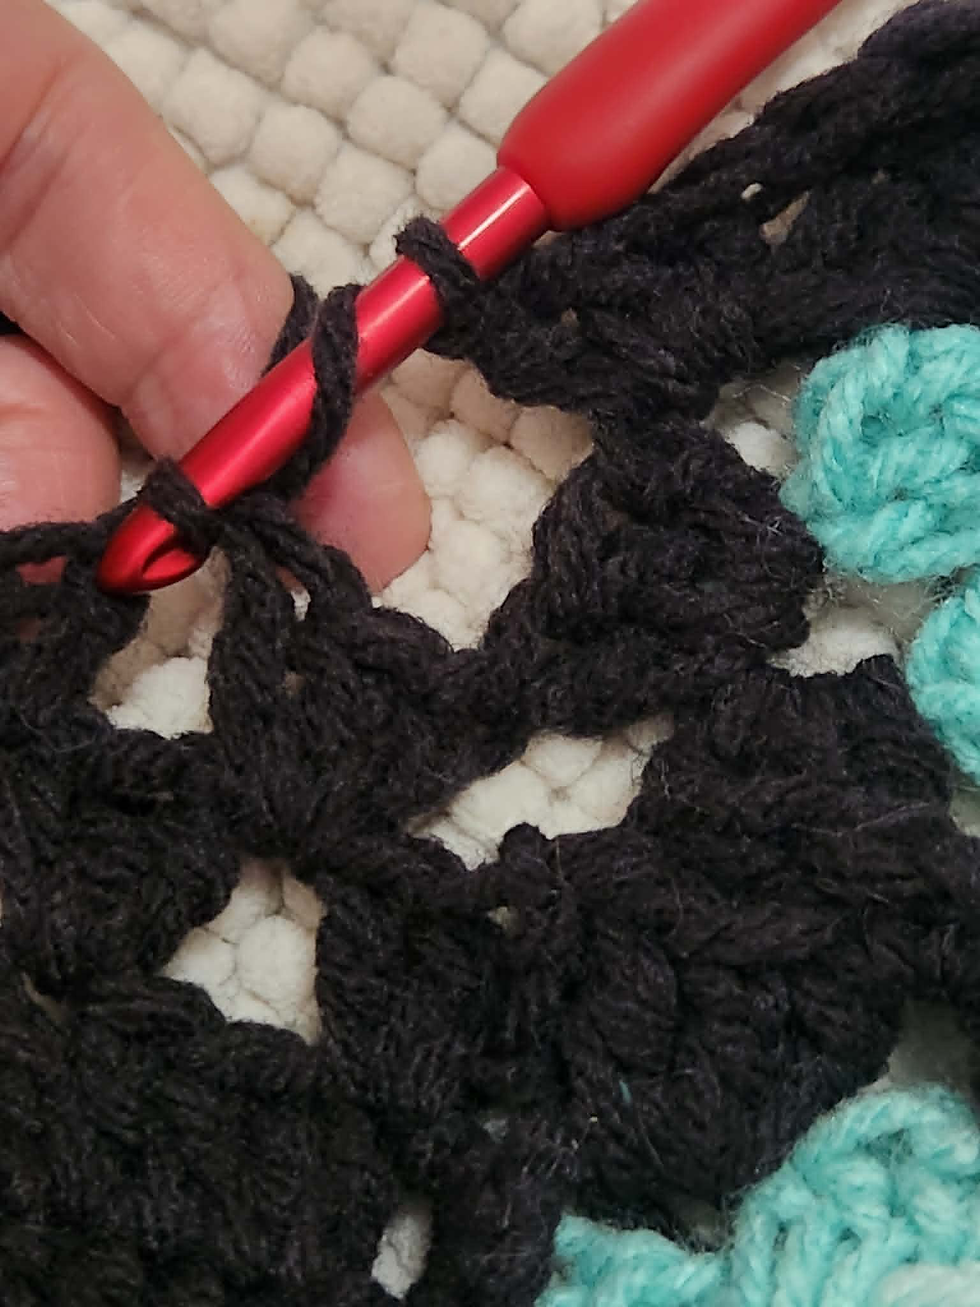
sk the next sp, 3 dc in each of the next 4 sp, sk next sp, work 3 dc in each sp until you reach the corner, 3 dc + 2 ch + 3 dc in the corner, 3 dc in each sp until you reach the end,
sl to the top of ch 3 to join, sl to the next sp (87 clusters)
Round 3: ch 3, 2 dc in the same sp, work 3 dc in each sp until you reach the corner, 3 dc + ch 2 + 3 dc in the corner, 3 dc in each sp until you reach the corner, 3 dc + ch 2 + 3 dc in the corner, 3 dc in each sp until you reach the end, sl to the top of ch 3 to join, sl to the next sp (89 clusters)
Round 4: ch 3, 2 dc in the same sp, work 3 dc in each sp until you reach the corner, 3 dc + ch 2 + 3 dc in the corner, 3 dc in each sp until you reach the 5 clusters on the back of the neck as pictured below:
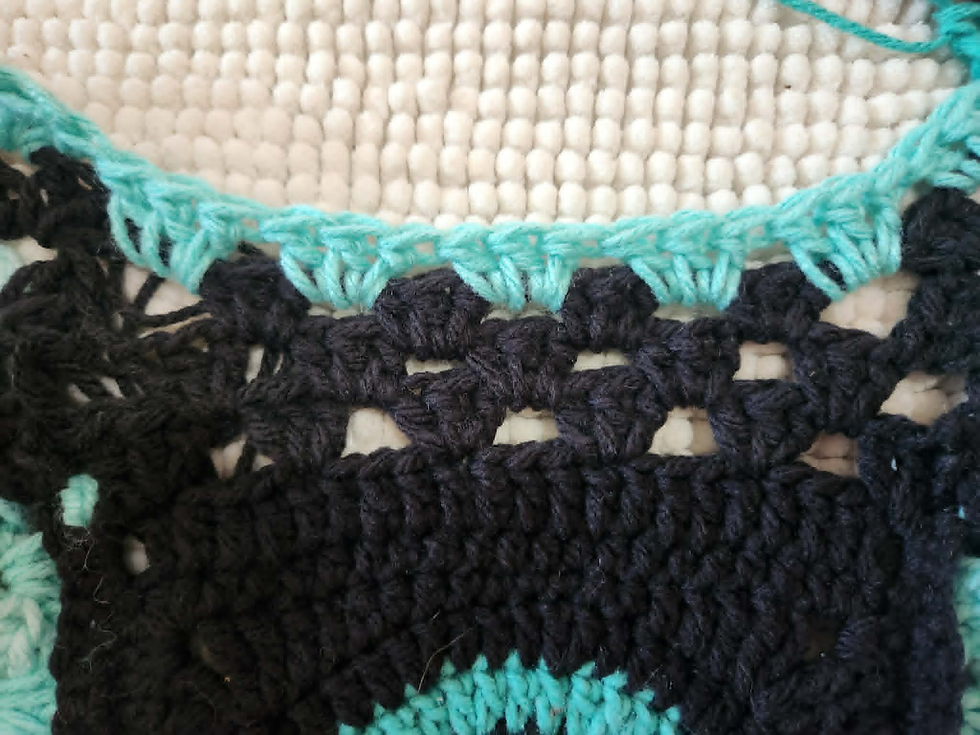
sk sp before clusters: work 1 hdc in each st = 15 hdc
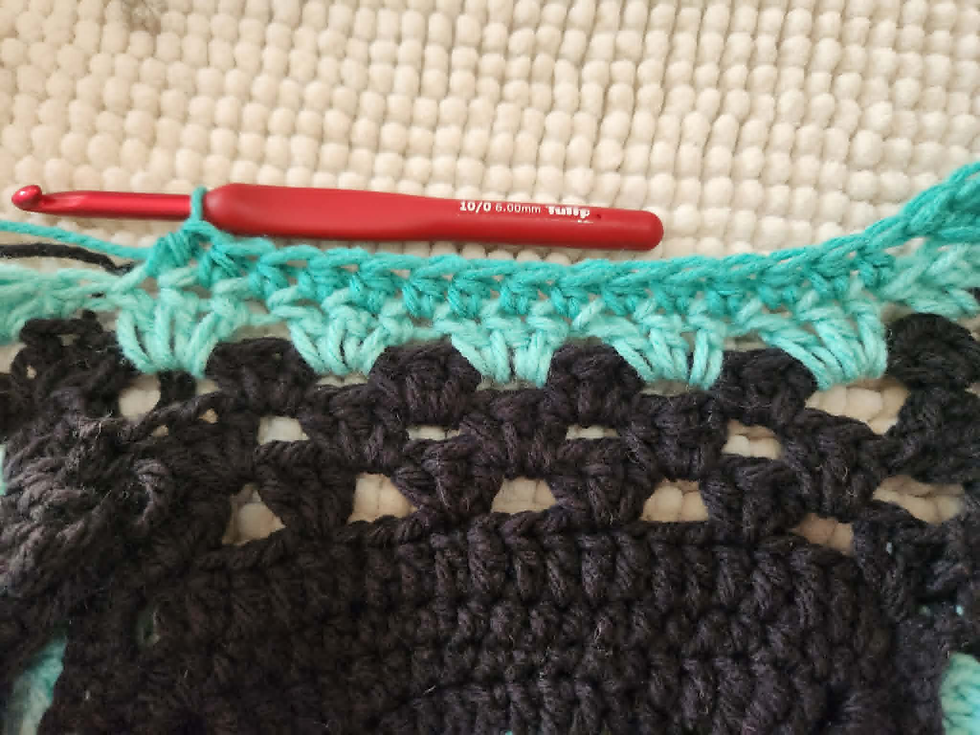
sk sp after clusters: 3 dc in each sp until you reach the corner, 3 dc + ch 2 + 3 dc in the
corner, 3 dc in each sp until you reach the end, sl to the top of ch 3 to join, sl to the next sp (85 clusters, 15 hdc )
Round 5: ch 3, 2 dc in the same sp, work 3 dc in each sp until you reach the corner, 3 dc + ch 2 + 3 dc in the corner, 3 dc in each sp until you reach the neck as pictured below:

sk sp before 15 hdc: work 1 sc in each st = 15 sc
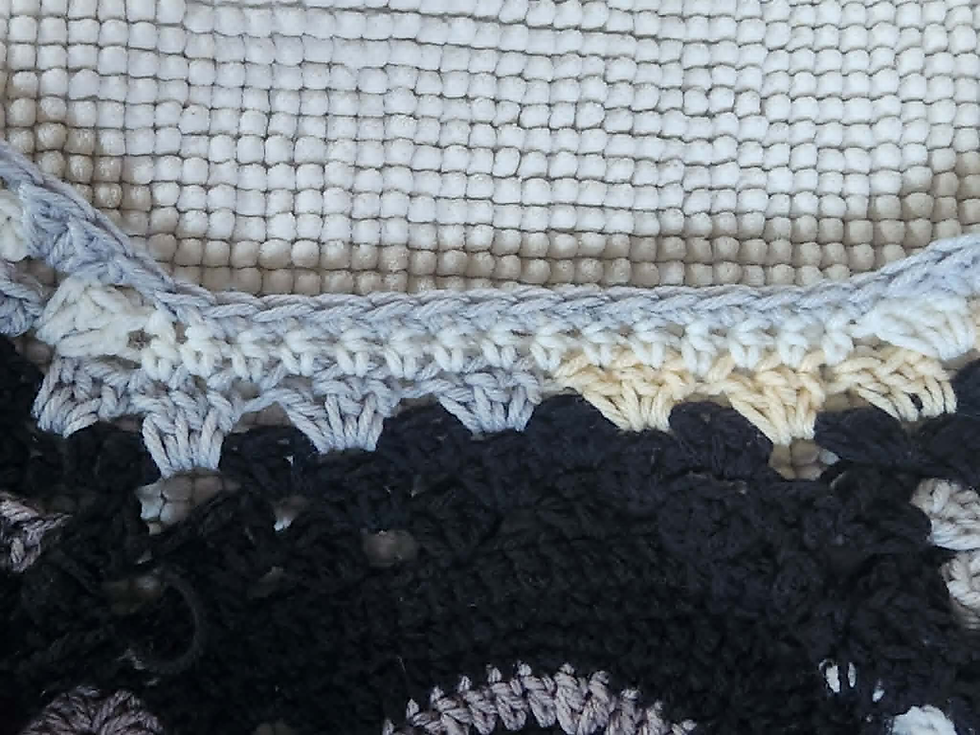
sk sp after 15 hdc: 3 dc in each sp until you reach the corner, 3 dc + ch 2 + 3 dc in the
corner, 3 dc in each sp until you reach the end, sl to the top of ch 3 to join,
sl to the next sp (86 clusters, 15 sc)
Finish off
Closing the Front:
Attach yarn to bottom corner of the front as pictured below:
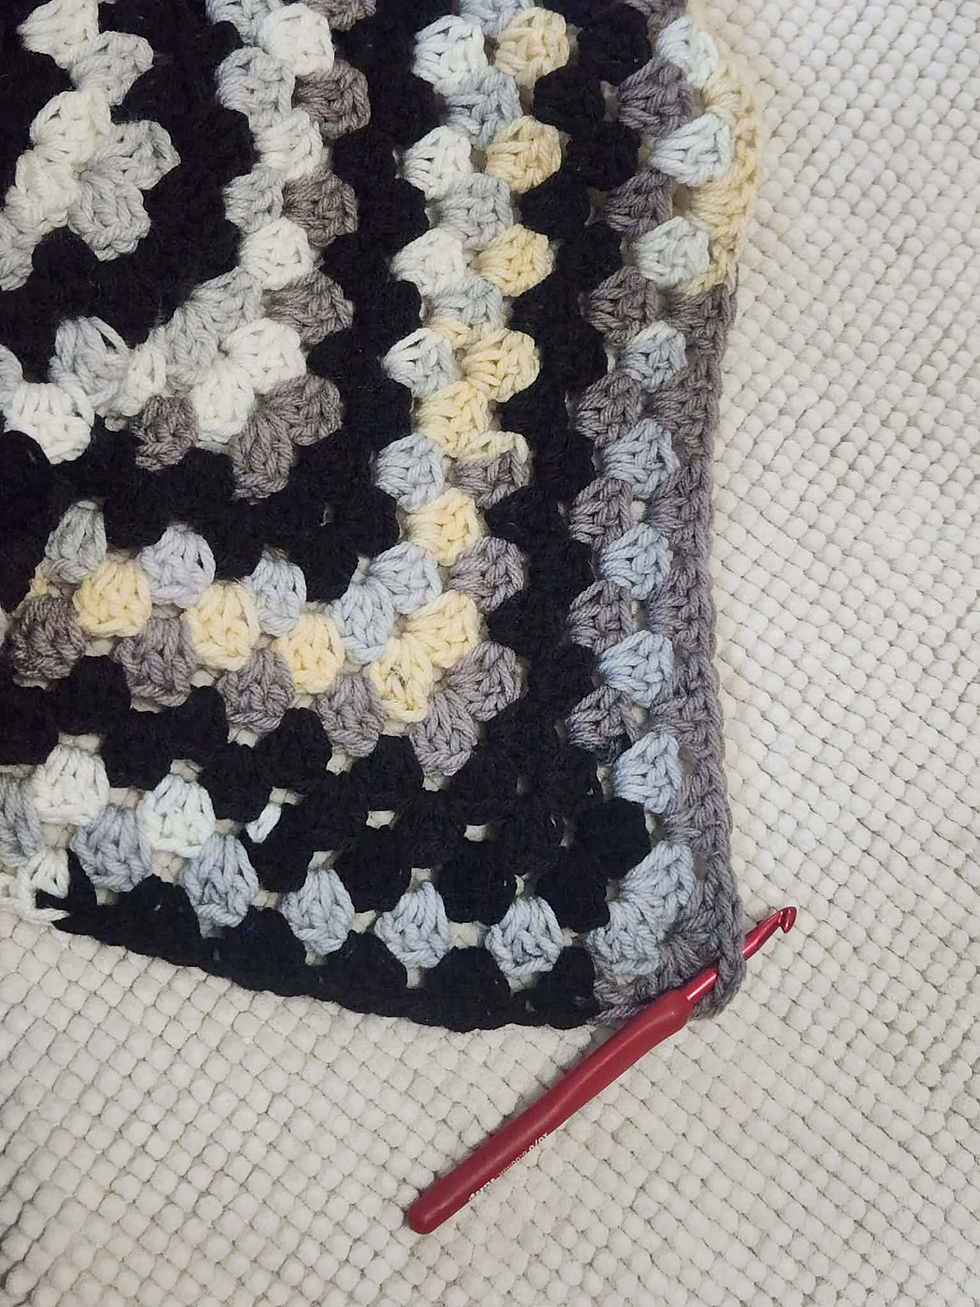
Row 1: ch 3, 2 dc in the same space, 3 dc in each of the next 11 sp (12 clusters)
Turn your work so you can now work back down the other side
*** When joining the panels, you will work back and forth between them, 3 dc on the side closest to you, then 1 sc on the side furthest from you ***
Row 2: 3 dc in the matching sp on the closer side, (1 sc in the next sp on the further side, 3 dc in the
next sp on the closer side) x11, 1 sc in the top of the starting ch 3 (12 clusters, 12 sc)
Finish off
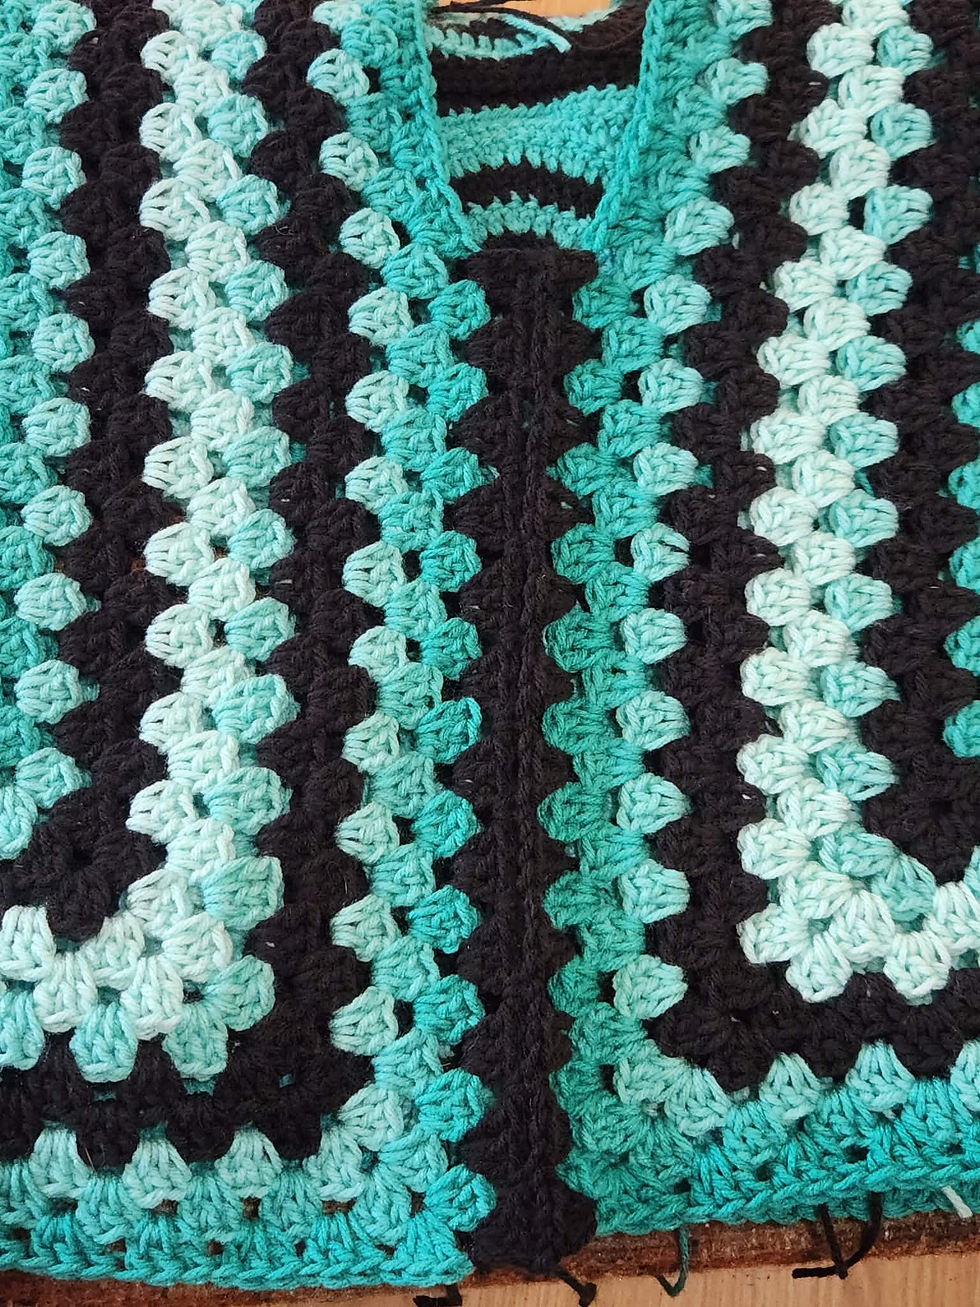
Extending Length:
Reattach yarn between any two clusters on the bottom: (I like to reattach at the back)
Round 1: ch 3, 2 dc in the same sp, 3 dc in each sp around, sl to the top of ch 3 to join,
sl to the next sp (50 clusters)
*** on final round DO NOT sl to the next sp ***
Repeat round 1 until the desired length has been achieved
Waistband = approx. 2”
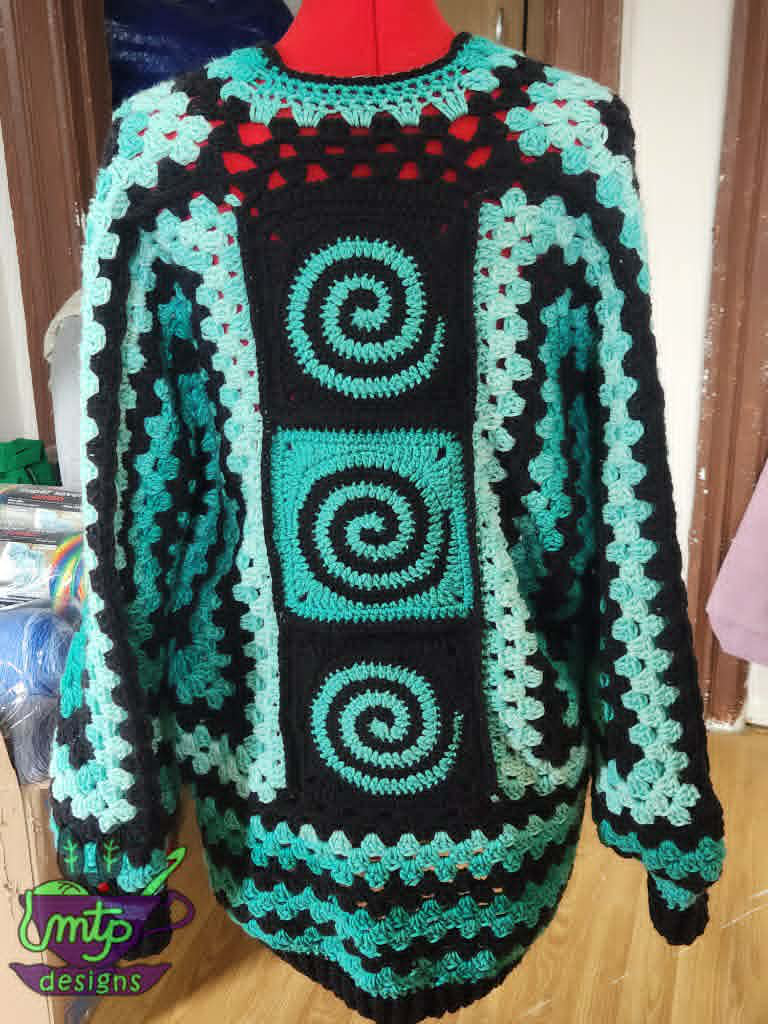
Do not finish off
Waistband:
Round 1: ch 3, 1 dc, repeat around, sl to the top of ch 3 to join (150)
Round 2 – 6: ch 1, 1 fpdc, 1 bpdc, repeat around, sl to join (150)
Finish off
Extending the Sleeves: (x2)
Attach yarn to the space between clusters at the join, as pictured below:
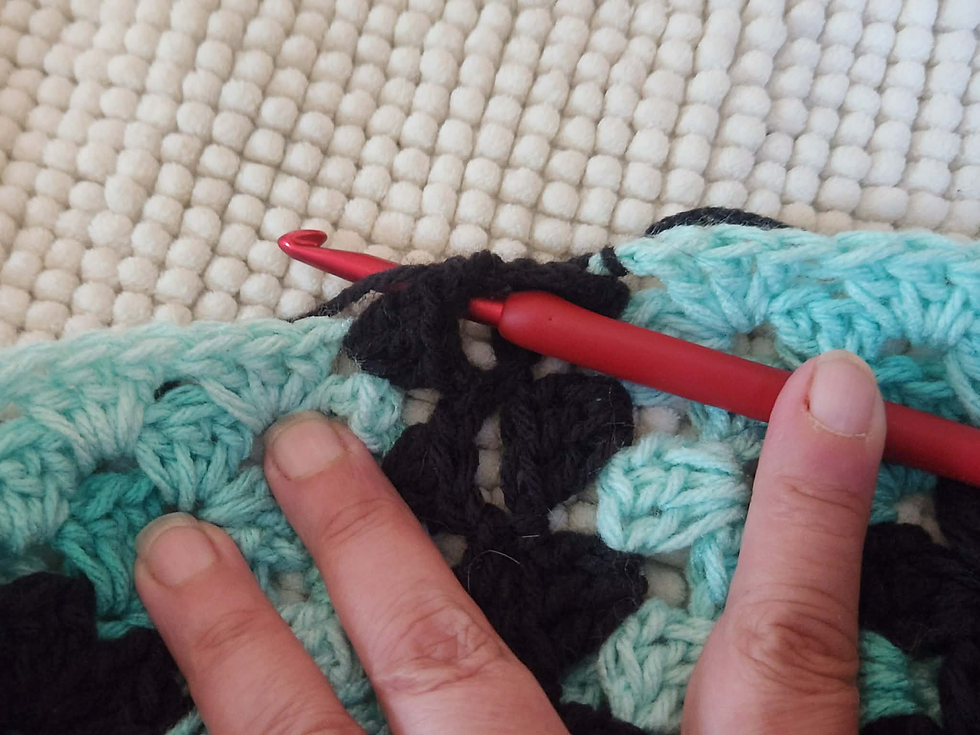
Round 1 – 6: ch 3, 2 dc in same space, 3 dc in each sp between clusters, sl to the top of the ch 3 to join, sl to the next sp (20 clusters)
Round 7: ch 3, 1 dc in the same space, 2 dc in each sp between clusters, sl to the top of the ch 3 to join, sl to the next sp (20 clusters)
Round 8: ch 3, 2 dc in the same space, (skip the next sp, 3 dc in the next sp) x10, sk last space, sl to the top of the ch 3 to join, sl to the next sp (10 clusters)
Round 9: ch 3, 2 dc in same space, 3 dc in each sp between clusters, sl to the top of the ch 3 to join, sl to the next sp (10 clusters)
Round 10: ch 3, 1 dc in the same space, 2 dc in the next sp, (3 dc in the next sp, 2 sc in the next 2 spaces) x6, 3 dc in the last sp, sl to the top of the ch 3 to join (10 clusters)
Cuff:
Round 11: ch 3, 1 dc in each st, repeat around, sl to the top of the ch 3 to join (24)
Round 12 – 16: ch 1, 1 fpdc, 1 bpdc, repeat around, sl to join (24)
Finish off
Finishing the Neckline:
Attach yarn to the first hdc beside the middle join as pictured below:

Working around the neckline: 1 hdc in each dc, 1 sl in each sc, when you get to the middle join work a 6 dctog across the top
6 dctog:
yo, insert into the sp between the cluster and the middle join,
draw up a loop, yo and pull through two loops,
(yo and insert around the dc post of the join cluster, draw up a loop, yo and draw through
two loops) x2
yo and insert into sp between clusters of join,
draw up a loop, yo and pull through two loops,
(yo and insert around the dc post of the join cluster, draw up a loop, yo and draw through
two loops) x2,
yo, insert into the sp between the middle join and the cluster,
draw up a loop, yo and pull through two loops,
yo and draw through 8 remaining loops
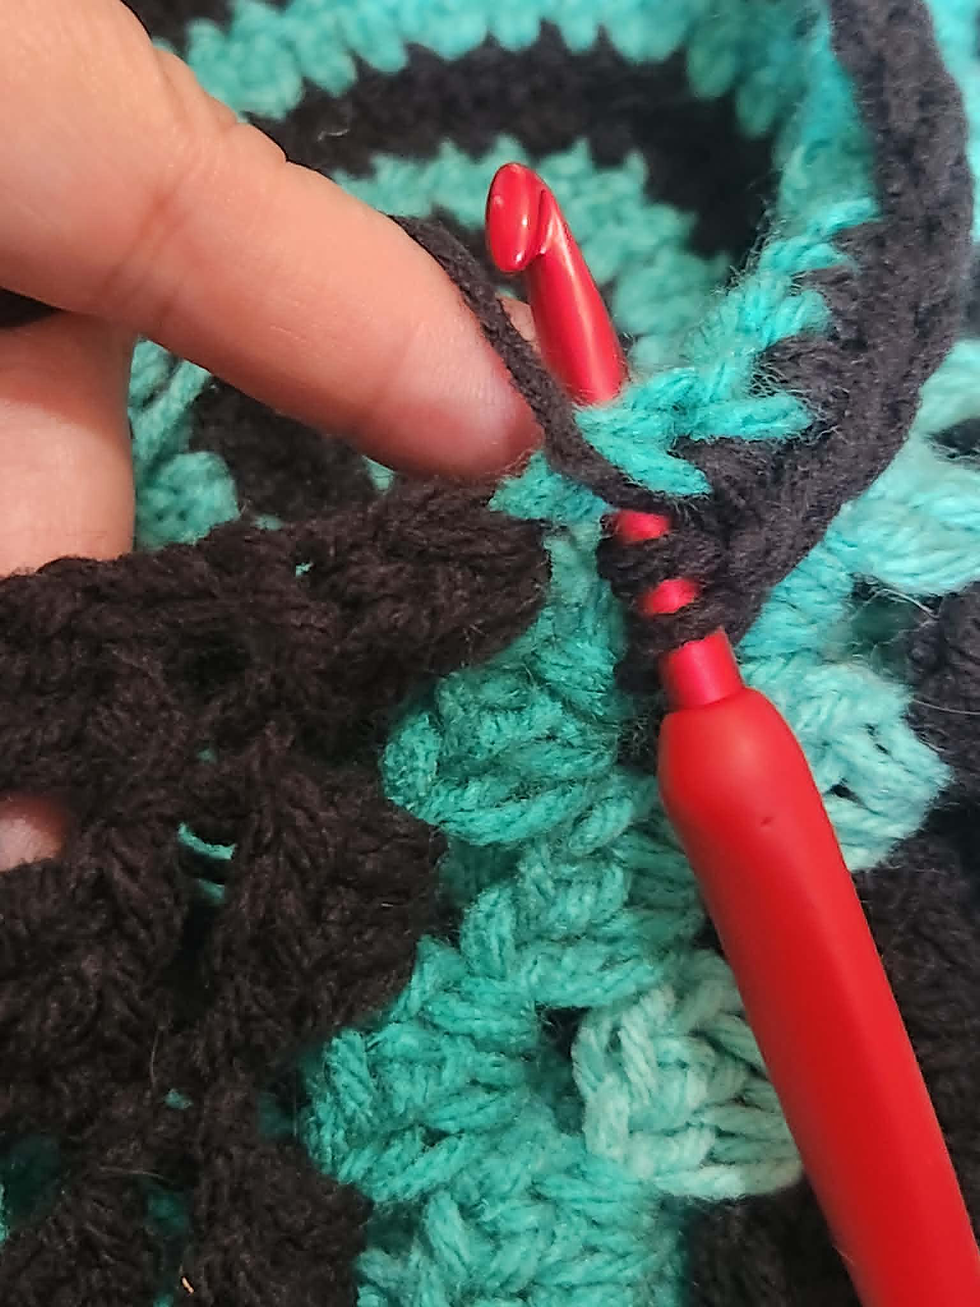
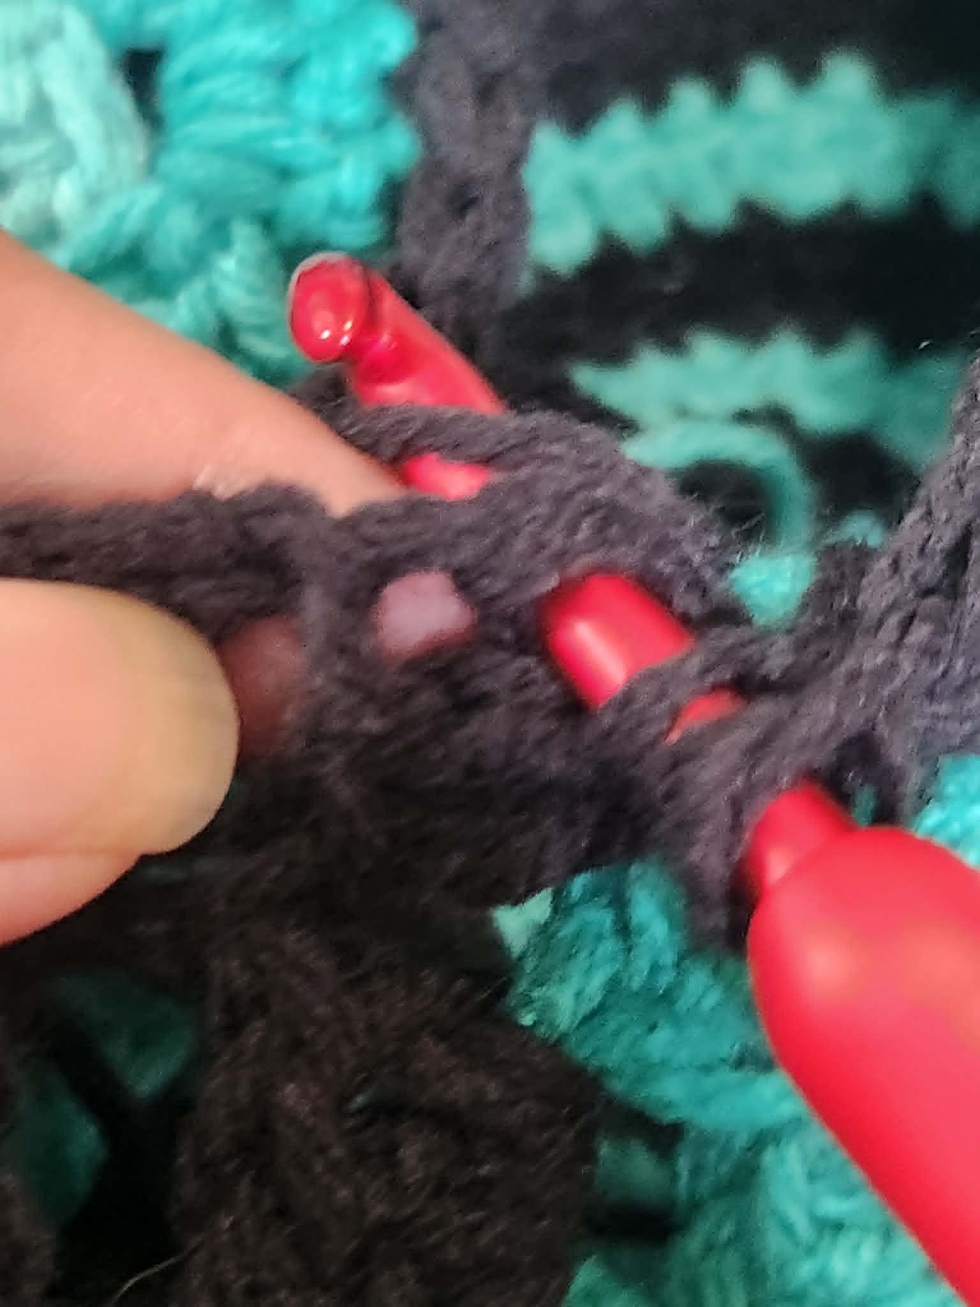

Join with a sl
Finish off and weave in ends
Copyright 2026 MTP: Designs, a subsidiary of Madd Tea Party Boutique, do not share or sell this pattern either in part or as a whole. You are free to make any items you wish from this pattern either for personal use or for sale, just give credit for pattern back to MTP: Designs and/or Madd Tea Party Boutique.
I also have a group specifically for my patterns, and getting help and sharing your creations:
Follow me on IG and FB to find when I release new patterns