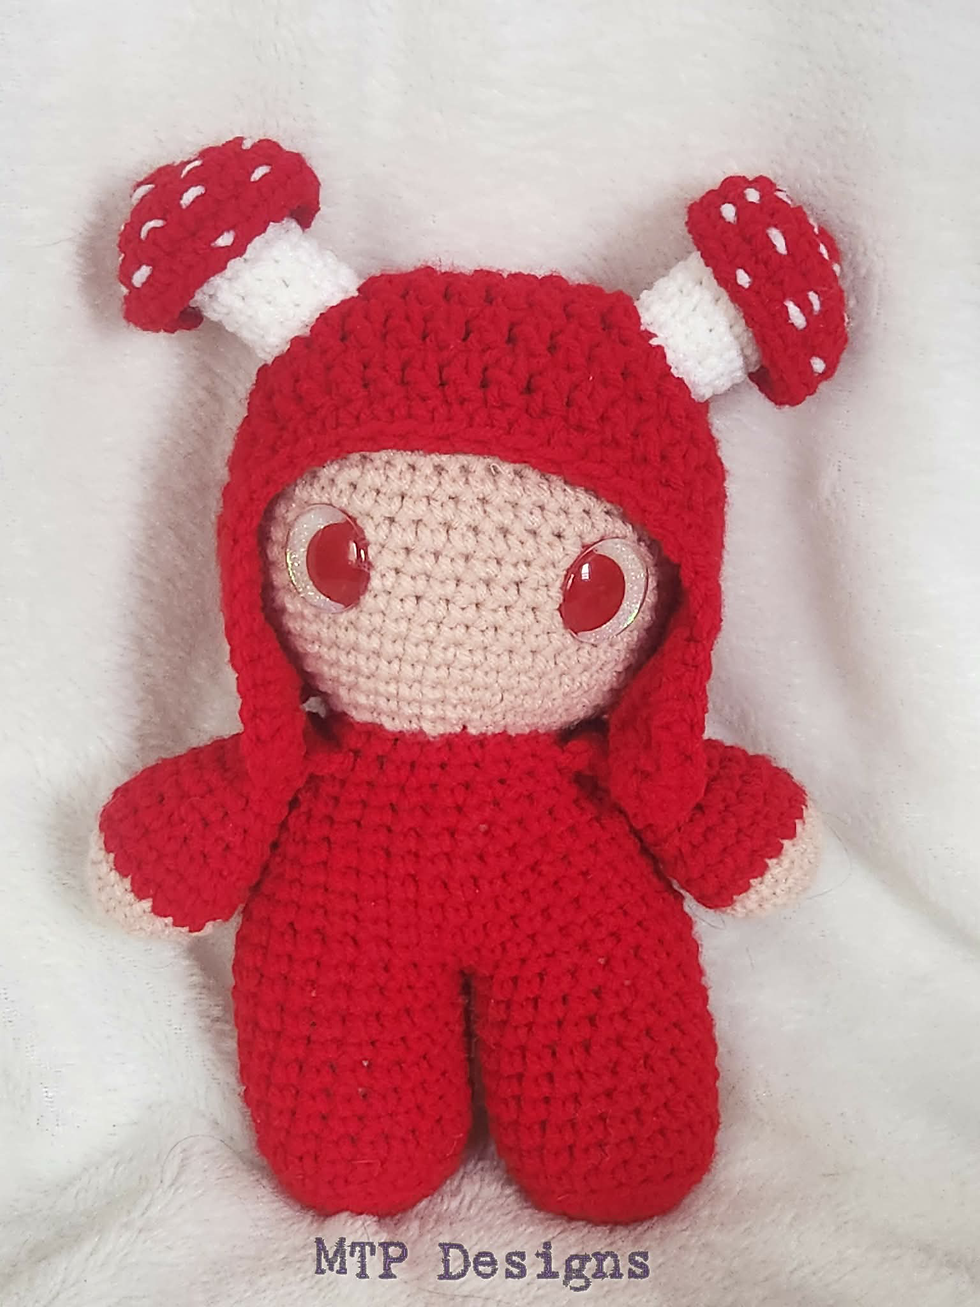
Jax The Jackalope Crochet Pattern
- lizzieb777
- Dec 12, 2025
- 6 min read

Jax The Little Jackalope brought to you by MTP
Designs a subsidiary of Madd Tea Party Boutique
Copyright 2022

Materials: #4 worsted weight yarn, approx 250 yards
Polyfibre fill
E 3.5mm hook for worsted weight
Needle for sewing in ends and attaching pieces
18mm-25mm safety eyes
Small pompom maker for the tail if you choose that tail version
Stitch Guide:
sl: slip stitch
ch: chain
sk: skip
st: stitch
yo: yarn over
mc: main colour
ac: accent colour
blo: back loop only
flo: front loop only
sc: single crochet
sc incr: single crochet increase
sc dec: single crochet decrease
hdc: half double crochet
hdc incr: half double crochet increase
hdc dec: half double crochet decrease
dc: double crochet
dc incr: double crochet increase
dc dec: double crochet decrease
tc: triple crochet
tc incr: triple crochet increase
tc dec: triple crochet decrease
Special Instructions: I suggest using the invisible dec wherever it says in the pattern to do a dec, it on those rows/rounds helps with the overall look of the item, and helps to reduce stuffing showing through
Gauge simply is not important with this item, changing the hook or yarn size will change the size of the finished piece, just make sure you use the appropriate size hook for your yarn
Meet the Maker: Hi! I'm Lizzie Livett-Buchanan, the strange and unusual mind behind the strange and unusual designs from MTP Designs. I love to create the weird, the unusual, and sometimes even the macabre! I hope you enjoy making this as much as I enjoyed writing it! I love to see what people come up with working with my patterns, so please join us in my group on facebook!!

Arms: (make two)
Start with a magic circle, or ch 3 with a sl to join, however you feel comfortable starting on the round
Round 1: 6 sc in the circle (6)
Round 2: 1 sc incr, repeat around (12)
Round 3: 1 sc, 1 sc incr, repeat around (18)
Round 4 – 5: 1 sc, repeat around (18)
Round 6: 1 sc dec, repeat around (9) stuff hand here leaving the rest unfilled
Round 7: 7 sc, 1 sc dec (8)
Round 8 – 21: 1 sc, repeat around (8)
Round 22: fold so both sides are touching and sc through both to close x4 (4) finish off

Legs: (make two)
Start with a magic circle, or ch 3 with a sl to join, however you feel comfortable starting on the round
Stuff firmly as you go
Round 1: 6 sc in the circle (6)
Round 2: 1 sc incr, repeat around (12)
Round 3: blo: 1 sc, 1 sc incr, repeat around (18)
Round 4 - 5: 1 sc, repeat around (18)
Round 6: 7 sc, 1 sc dec, repeat around (16)
Round 7: 6 sc, 1 sc dec, repeat around (14)
Round 8: 5 sc, 1 sc dec, repeat around (12)
Round 9 – 10: 1 sc, repeat around (12)
Here you will finish off the first leg, leaving a longer tail to sew closed the hole that will be left behind when you attach the legs, do NOT finish off the second leg, instead continue on to the next set of instructions:

Round 11: ch 3, sc into the first st on the first leg, and the next 11, 3 sc into the back bump of the ch 3, sc x12 around the second leg, 3 sc into the front loops of the ch 3 (30)


Round 12: 4 sc, 1 sc incr, repeat around (36)
Round 13: 5 sc, 1 sc incr, repeat around (42)
Sew hole closed
Stuff firmly as you go
Round 14 – 16: 1 sc, repeat around (42)
Round 17: 5 sc, 1 sc dec, repeat around (36)
Round 18: 1 sc, repeat around (36)
Round 19: 4 sc, 1 sc dec, repeat around (30)
Round 20 – 21: 1 sc, repeat around (30)
Round 22: 3 sc, 1 sc dec, repeat around (24)
Round 23: 1 sc, repeat around (24)
Round 24: 2 sc, 1 sc dec, repeat around (18)
Round 25: 1 sc, repeat around (18)
Round 26: attaching the arms: 4 sc, hold arm up to your work and sc through both pieces x4, 5 sc, hold second arm up to your work and sc through both x4, 1 sc (18)

Alternate Round 26: 1 sc, repeat around (18)
Round 27: 1 sc, repeat around (18)
Head
Round 28: 1 sc, 1 sc incr, repeat around (27)
Round 29: 1 sc, 1 sc incr, 1 sc in the last st (40)
Round 30: 3 sc, 1 sc incr, repeat around (50)
Round 31: 9 sc, 1 sc incr, repeat around (55)
Round 32 – 41: 1 sc, repeat around (55)
Round 42: 9 sc, 1 sc dec, repeat around (50)
Insert eyes between rounds 36/37 with approx. 7/9 st showing between
Round 43: 8 sc, 1 sc dec, repeat around (45)
Round 44: 7 sc, 1 sc dec, repeat around (40)
Round 45: 6 sc, 1 sc dec, repeat around (35)
Round 46: 5 sc, 1 sc dec, repeat around (30)
Round 47: 4 sc, 1 sc dec, repeat around (25)
Round 48: 3 sc, 1 sc dec, repeat around (20)
Round 49: 2 sc, 1 sc dec, repeat around (15)
Round 50: 1 sc, 1 sc dec, repeat around (10)
Round 51: 1 sc dec, repeat around (5)
Finish off and weave in ends

Ears: (make two)
Start with a magic circle, or ch 3 with a sl to join, however you feel comfortable starting on the round
Round 1: 6 sc in the circle (6)
Round 2: 1 sc incr, repeat around (12)
Round 3: 1 sc, 1 sc incr, repeat around (18)
Round 4: 1 sc, repeat around (18)
Round 5: 2 sc, 1 sc incr, repeat around (24)
Round 6 – 9: 1 sc, repeat around (24)
Round 10: 7 sc, 1 sc incr, repeat around (27)
Round 11 – 12: 1 sc, repeat around (27)
Round 13: 8 sc, 1 sc incr, repeat around (30)
Round 14 – 23: 1 sc, repeat around (30)
Round 24: 3 sc, 1 sc dec, repeat around (24)
Round 25 – 27: 1 sc, repeat around (24)
Round 28: 6 sc, 1 sc dec, repeat around (21)
Round 29: 1 sc, repeat around (21)
Round 30: 5 sc, 1 sc dec, repeat around (18)
Round 31 – 32: 1 sc, repeat around (18)
Round 33: 4 sc, 1 sc dec, repeat around (15)
Round 34 – 37: 1 sc, repeat around (15)
Round 38: 3 sc, 1 sc dec, repeat around (12)
Round 39 – 46: 1 sc, repeat around (12)
Round 47: fold so both sides are touching and sc through both to close x6 (6)
Finish off with a long tail to sew to the head

Tail:
Start with a magic circle, or ch 3 with a sl to join, however you feel comfortable starting on the round
Round 1: 6 sc in the circle (6)
Round 2: 1 sc incr, repeat around (12)
Round 3: 1 sc, 1 sc incr, repeat around (18)
Round 4: 2 sc, 1 sc incr, repeat around (24)
Round 5 – 7: 1 sc, repeat around (24)
Round 8: 2 sc, 1 sc dec, repeat around (18)
Round 9: 4 sc, 1 sc dec, repeat around, sl to join (15)
Finish off with a long tail to sew to the body

Antlers: (make two)
Start with a magic circle, or ch 3 with a sl to join, however you feel comfortable starting on the round
Round 1: 6 sc in the circle (6)
Round 2: 2 sc, 1 sc incr, repeat around (8)
Round 3 – 6: 1 sc, repeat around, join with a sl on the last round (8)
Finish off with a long tail to sew to the head

Eyes: (make two)
Start with a magic circle, or ch 3 with a sl to join, however you feel comfortable starting on the round
Round 1: 6 sc in the circle (6)
Round 2: 1 sc incr, repeat around, sl to join (12)
Finish off with a long tail to sew to the head

Eyelids:
Start with a magic circle, or ch 3 with a sl to join, however you feel comfortable starting on the round
Row 1: 6 sc in the circle, turn (6)
Row 2: ch 1, 1 sc, 1 sc incr, 2 sc, 1 sc incr, 1 sc, turn (8)
Row 3: ch 1, 1 sc, 2 sc incr, 2 sc, 2 sc incr, 1 sc, turn (12)
Row 4: ch 1, 5 sc, 2 sc incr, 5 sc (14)
Row 5: ch 1, sc across the bottom x6 (6)
Finish off with a long tail to sew to the head

Assembly:
Arms: attach to round 26
Ears: attach to round 43
Tail: attach so the bottom is touching round 13
Antlers: attach to either side evenly so the middle is touching round 47


Copyright 2022 MTP: Designs, a subsidiary of Madd Tea Party Boutique, do not share or sell this pattern either in part or as a whole. You are free to make any items you wish from this pattern either for personal use or for sale, just give credit for pattern back to MTP: Designs and/or Madd Tea Party Boutique.
I also have a group specifically for my patterns, and getting help and sharing your creations:
Follow me on IG and FB to find when I release new patterns